Manually Build a Pro Blockchain Network(No tars console)
Tags: “Pro version of the blockchain network” “” deployment “” does not rely on the tars web console “
Pro version of FISCO BCOS 3.x can be built without relying on tars web console。This document takes the example of deploying a blockchain service with two institutions and two nodes on a single machine to introduce the process of building and deploying FISCO BCOS in the Pro version without relying on the tars web console。
Note
Pro version does not rely on the tars web console to build FISCO BCOS “BcosBuilder / pro” tool for chain building and expansion and other related operations, please refer to the introduction of this tool ‘BcosBuilder<./pro_builder.html>`_
注意:
1. Installation Dependencies
The deployment tool ‘BcosBuilder’ depends on ‘python3, curl’. Depending on the operating system you are using, use the following command to install the dependency。
Install Ubuntu Dependencies(Version not less than Ubuntu18.04)
sudo apt-get update
sudo apt-get install -y curl python3 wget
Installing CentOS Dependencies(Version not less than CentOS 7)
sudo yum install -y curl python3 python3-devel wget
Install macOS dependencies
brew install curl python3 wget
2. Download the Pro version of the blockchain build tool BcosBuilder
Note
Deployment tool “BcosBuilder” configuration and use please refer to ‘here<./pro_builder.html>`_
If downloading the deployment tool “BcosBuilder” from github is too slow, please try: curl -#LO https://osp-1257653870.cos.ap-guangzhou.myqcloud.com/FISCO-BCOS/FISCO-BCOS/releases/v3.6.0/BcosBuilder.tgz && tar -xvf BcosBuilder.tgz
# Create action directory
mkdir -p ~/fisco && cd ~/fisco

# Download the Pro version of the blockchain build tool BcosBuilder
curl -#LO https://github.com/FISCO-BCOS/FISCO-BCOS/releases/download/v3.6.0/BcosBuilder.tgz && tar -xvf BcosBuilder.tgz

# Note: If the network speed is too slow, try the following command to download the deployment script:
curl -#LO https://osp-1257653870.cos.ap-guangzhou.myqcloud.com/FISCO-BCOS/FISCO-BCOS/releases/v3.6.0/BcosBuilder.tgz && tar -xvf BcosBuilder.tgz

# Install Build Tools Dependency Pack
cd BcosBuilder && pip3 install -r requirements.txt
3. Deploy Pro version blockchain nodes
Pro version FISCO BCOS includes RPC service, Gateway service and blockchain node service BcosNodeService。
-RPC service: responsible for receiving client requests and forwarding the requests to nodes for processing, RPC service can be scaled horizontally, and one RPC service can access multiple blockchain node services
Gateway service: responsible for network communication between blockchain nodes across institutions. The Gateway service is horizontally scalable, and one Gateway service can access multiple blockchain node services
Blockchain node service ‘BcosNodeService’: Provides blockchain-related services, including consensus, execution, and transaction blockchain. The node service accesses RPC services and Gateway services to obtain network communication functions。
For the overall architecture design of Pro version FISCO BCOS, please refer to here。
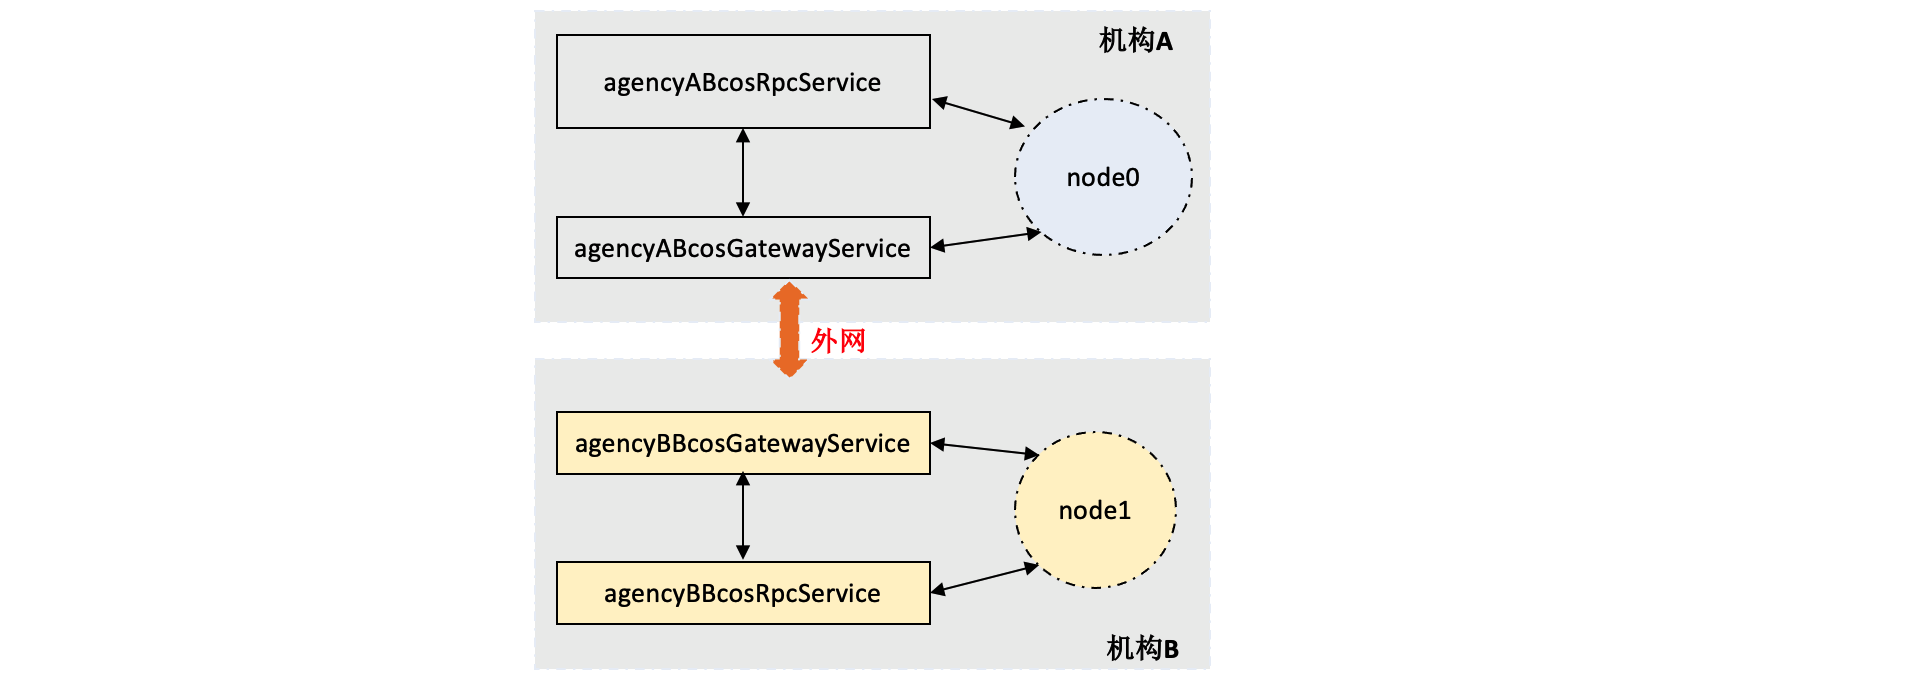
This chapter takes the example of deploying a 2-mechanism 2-node blockchain service on a single machine to introduce the FISCO BCOS deployment process of the Pro version that does not rely on the tars web console. The corresponding service networking mode is as follows:
3.1 Download Binary
Before building the Pro version of FISCO BCOS, you need to download the binary package. BcosBuilder provides a static binary package download function based on Linux. The command to download the latest binary is as follows:
Note
You can view the script usage through “python3 build _ chain.py -h”
You can view the usage of the build installation package through “python3 build _ chain.py build -h”
Use the “python3 build _ chain.py download _ binary” command to download the executable binary file. The binary file is downloaded to the “binary” directory by default
If downloading binary is slow, please try:
python3 build_chain.py download_binary -t cdn
# Enter the operation directory
cd ~/fisco/BcosBuilder/pro

# Run the build _ chain.py script to download the binary. The binary package is downloaded to the binary directory by default
python3 build_chain.py download_binary
3.2 Use of tools
‘build _ chain.py ‘provides the’ build ‘command to build an installation package that does not depend on the’ tars’ web console, as follows:
$ python3 build_chain.py build --help
usage: build_chain.py build [-h] [-t TYPE] -c CONFIG [-O OUTPUT]

e.g:
python3 build_chain.py build -c conf/config-build-example.toml -O output_dir
python3 build_chain.py build -c conf/config-build-example.toml -t node -O output_dir
python3 build_chain.py build -c conf/config-build-example.toml -t rpc  -O output_dir
python3 build_chain.py build -c conf/config-build-example.toml -t gateway  -O output_dir

options:
  -h, --help            show this help message and exit
  -t TYPE, --type TYPE  [Optional] specify the type:
                        * type list: rpc, gateway, node, all
  -c CONFIG, --config CONFIG
                        [Required] the config file, default is config.toml:
                         * config to build chain example: conf/config-build-example.toml
  -O OUTPUT, --output OUTPUT
                        [Optional] specify the output dir, default is ./generated
Parameters:
-c: Configuration file, default ‘. / config.toml’
-O: The directory of the installation package. Default value ‘. / generated’
-t: Specify the service type for building the installation package: ‘rpc ‘,’ gateway ‘,’ node ‘, default value’ all ‘, build the installation package of all services
3.3 Build installation package
In the ‘BcosBuilder’ directory, run the following command to build installation packages for two node services, two RPC services, and two gateway services. The IP addresses are all ‘127.0.0.1’:
RPC Service: ‘20200 ‘and’ 20201’
Gateway Service: ‘30300 ‘and’ 30301’ -tars port:
40401~40407、40411~40417
注意: When building an environment that does not rely on the tars page management console, because there is no tars page management console, the tars module in each microservice listening port and connection information needs to use the configuration file management, you can refer to the tars configuration file description。
3.3.1 tars configuration file
Build an environment that does not rely on the tars web management console. Since there is no tars management background, the tars module of each service needs to use configuration file management to monitor and connect information。
Each service will have two additional configuration files’ tars.conf ‘and’ tars _ proxy.ini’
$ ls -a 127.0.0.1/*/conf/tars.conf
127.0.0.1/gateway_30300/conf/tars.conf
127.0.0.1/group0_node_40402/conf/tars.conf
127.0.0.1/rpc_20200/conf/tars.conf
127.0.0.1/gateway_30301/conf/tars.conf
127.0.0.1/group0_node_40412/conf/tars.conf
127.0.0.1/rpc_20201/conf/tars.conf
$ ls -a 127.0.0.1/*/conf/tars_proxy.ini
127.0.0.1/gateway_30300/conf/tars_proxy.ini
127.0.0.1/group0_node_40402/conf/tars_proxy.ini
127.0.0.1/rpc_20200/conf/tars_proxy.ini
127.0.0.1/gateway_30301/conf/tars_proxy.ini
127.0.0.1/group0_node_40412/conf/tars_proxy.ini
127.0.0.1/rpc_20201/conf/tars_proxy.ini
3.3.1.1. tars.conf
the server - side monitoring information of the internal tars module of the service
3.3.1.1.1 RPC Service
$ cat 127.0.0.1/rpc_20200/conf/tars.conf
<tars>
  <application>
    enableset=n
    setdivision=NULL
    <server>
      app=chain0
      server=agencyABcosRpcService
      localip=127.0.0.1
      basepath=./conf/
      datapath=./.data/
      logpath=./log/
      logsize=100M
      lognum=5
      logLevel=INFO
      deactivating-timeout=3000
      activating-timeout=10000
      opencoroutine=0
      coroutinememsize=1G
      coroutinestack=128K
      closecout=0
      netthread=4
      <chain0.agencyABcosRpcService.RpcServiceObjAdapter>
        allow
        endpoint=tcp -h 127.0.0.1 -p 40400 -t 60000
        maxconns=100000
        protocol=tars
        queuecap=50000
        queuetimeout=20000
        servant=chain0.agencyABcosRpcService.RpcServiceObj
        threads=8
      </chain0.agencyABcosRpcService.RpcServiceObjAdapter>
    </server>
    <client>
      sync-invoke-timeout=3000
      async-invoke-timeout=5000
      asyncthread=8
      modulename=chain0.agencyABcosRpcService
    </client>
  </application>
</tars>
for details of tars configuration, refer tohttps://doc.tarsyun.com/#/base/tars-template.md
As configuration example:
<chain0.agencyABcosRpcService.RpcServiceObjAdapter>
        allow
        endpoint=tcp -h 127.0.0.1 -p 40400 -t 60000
        maxconns=100000
        protocol=tars
        queuecap=50000
        queuetimeout=20000
        servant=chain0.agencyABcosRpcService.RpcServiceObj
        threads=8
      </chain0.agencyABcosRpcService.RpcServiceObjAdapter>
There is a tars rpc module inside the RPC service, listening on port ‘40400’
注意: Modify the ‘tars’ listening information inside the service. You can modify the ‘[agency.rpc] tars _ listen _ ip’ and ‘tars _ listen _ port’ configurations of ‘config.toml’ during build
[agency.rpc]
    deploy_ip=["127.0.0.1"]
    # rpc listen ip
    listen_ip="0.0.0.0"
    # rpc listen port
    listen_port=20201
    thread_count=4
    # rpc tars server listen ip
    tars_listen_ip="0.0.0.0"   # Modify the IP address of the TARS listener
    # rpc tars server listen port
    tars_listen_port=40410     # modify the port on which tars listens
3.3.1.1.2 Gateway Gateway Service
$ cat 127.0.0.1/gateway_30300/conf/tars.conf
<tars>
  <application>
    enableset=n
    setdivision=NULL
    <server>
      app=chain0
      server=agencyABcosGatewayService
      localip=127.0.0.1
      basepath=./conf/
      datapath=./.data/
      logpath=./log/
      logsize=100M
      lognum=10
      logLevel=INFO
      deactivating-timeout=3000
      activating-timeout=10000
      opencoroutine=0
      coroutinememsize=1G
      coroutinestack=128K
      closecout=0
      netthread=4
      <chain0.agencyABcosGatewayService.GatewayServiceObjAdapter>
        allow
        endpoint=tcp -h 127.0.0.1 -p 40401 -t 60000
        maxconns=100000
        protocol=tars
        queuecap=50000
        queuetimeout=20000
        servant=chain0.agencyABcosGatewayService.GatewayServiceObj
        threads=8
      </chain0.agencyABcosGatewayService.GatewayServiceObjAdapter>
    </server>
    <client>
      sync-invoke-timeout=3000
      async-invoke-timeout=5000
      asyncthread=8
      modulename=chain0.agencyABcosGatewayService
    </client>
  </application>
</tars>
for details of tars configuration, refer tohttps://doc.tarsyun.com/#/base/tars-template.md
As configuration example:
<chain0.agencyABcosGatewayService.GatewayServiceObjAdapter>
        allow
        endpoint=tcp -h 127.0.0.1 -p 40401 -t 60000
        maxconns=100000
        protocol=tars
        queuecap=50000
        queuetimeout=20000
        servant=chain0.agencyABcosGatewayService.GatewayServiceObj
        threads=8
      </chain0.agencyABcosGatewayService.GatewayServiceObjAdapter>
There is a tars gateway module inside the Gateway service, listening on port ‘40401’
注意: Modify the ‘tars’ listening information inside the service. You can modify the ‘[agency.gateway] tars _ listen _ ip’ and ‘tars _ listen _ port’ configurations of ‘config.toml’ during build
[agency.gateway]
    deploy_ip=["127.0.0.1"]
    # gateway listen ip
    listen_ip="0.0.0.0"
    # gateway listen port
    listen_port=30300
    # gateway connected peers, should be all of the gateway peers info
    peers=["127.0.0.1:30300", "127.0.0.1:30301"]
    # gateway tars server listen ip
    tars_listen_ip="0.0.0.0"        # Modify the listening IP address of tars
    # gateway tars server listen port
    tars_listen_port=40401          # modify the tars listening port
3.3.1.1.3 Node Services
cat 127.0.0.1/group0_node_40402/conf/tars.conf
<tars>
  <application>
    enableset=n
    setdivision=NULL
    <server>
      app=chain0
      server=agencyAgroup0node0BcosNodeService
      localip=127.0.0.1
      basepath=./conf/
      datapath=./.data/
      logpath=./log
      logsize=100M
      lognum=10
      logLevel=INFO
      deactivating-timeout=3000
      activating-timeout=10000
      opencoroutine=0
      coroutinememsize=1G
      coroutinestack=128K
      closecout=0
      netthread=4
      <chain0.agencyAgroup0node0BcosNodeService.TxPoolServiceObjAdapter>
        allow
        endpoint=tcp -h 127.0.0.1 -p 40402 -t 60000
        maxconns=100000
        protocol=tars
        queuecap=50000
        queuetimeout=20000
        servant=chain0.agencyAgroup0node0BcosNodeService.TxPoolServiceObj
        threads=8
      </chain0.agencyAgroup0node0BcosNodeService.TxPoolServiceObjAdapter>
      <chain0.agencyAgroup0node0BcosNodeService.SchedulerServiceObjAdapter>
        allow
        endpoint=tcp -h 127.0.0.1 -p 40403 -t 60000
        maxconns=100000
        protocol=tars
        queuecap=50000
        queuetimeout=20000
        servant=chain0.agencyAgroup0node0BcosNodeService.SchedulerServiceObj
        threads=8
      </chain0.agencyAgroup0node0BcosNodeService.SchedulerServiceObjAdapter>
      <chain0.agencyAgroup0node0BcosNodeService.PBFTServiceObjAdapter>
        allow
        endpoint=tcp -h 127.0.0.1 -p 40404 -t 60000
        maxconns=100000
        protocol=tars
        queuecap=50000
        queuetimeout=20000
        servant=chain0.agencyAgroup0node0BcosNodeService.PBFTServiceObj
        threads=8
      </chain0.agencyAgroup0node0BcosNodeService.PBFTServiceObjAdapter>
      <chain0.agencyAgroup0node0BcosNodeService.LedgerServiceObjAdapter>
        allow
        endpoint=tcp -h 127.0.0.1 -p 40405 -t 60000
        maxconns=100000
        protocol=tars
        queuecap=50000
        queuetimeout=20000
        servant=chain0.agencyAgroup0node0BcosNodeService.LedgerServiceObj
        threads=8
      </chain0.agencyAgroup0node0BcosNodeService.LedgerServiceObjAdapter>
      <chain0.agencyAgroup0node0BcosNodeService.FrontServiceObjAdapter>
        allow
        endpoint=tcp -h 127.0.0.1 -p 40406 -t 60000
        maxconns=100000
        protocol=tars
        queuecap=50000
        queuetimeout=20000
        servant=chain0.agencyAgroup0node0BcosNodeService.FrontServiceObj
        threads=8
      </chain0.agencyAgroup0node0BcosNodeService.FrontServiceObjAdapter>
    </server>
    <client>
      sync-invoke-timeout=3000
      async-invoke-timeout=5000
      asyncthread=8
      modulename=chain0.agencyAgroup0node0BcosNodeService
    </client>
  </application>
</tars>
As configuration example:
The node service contains five tars modules: TxPool, Scheduler, PBFT, Ledger, and Front。
TxPool
<chain0.agencyAgroup0node0BcosNodeService.TxPoolServiceObjAdapter>
        allow
        endpoint=tcp -h 127.0.0.1 -p 40402 -t 60000
        maxconns=100000
        protocol=tars
        queuecap=50000
        queuetimeout=20000
        servant=chain0.agencyAgroup0node0BcosNodeService.TxPoolServiceObj
        threads=8
      </chain0.agencyAgroup0node0BcosNodeService.TxPoolServiceObjAdapter>
Transaction pool module listening port: 40402
Scheduler
<chain0.agencyAgroup0node0BcosNodeService.SchedulerServiceObjAdapter>
        allow
        endpoint=tcp -h 127.0.0.1 -p 40403 -t 60000
        maxconns=100000
        protocol=tars
        queuecap=50000
        queuetimeout=20000
        servant=chain0.agencyAgroup0node0BcosNodeService.SchedulerServiceObj
        threads=8
      </chain0.agencyAgroup0node0BcosNodeService.SchedulerServiceObjAdapter>
Scheduler module listening port: 40403
PBFT
<chain0.agencyAgroup0node0BcosNodeService.PBFTServiceObjAdapter>
        allow
        endpoint=tcp -h 127.0.0.1 -p 40404 -t 60000
        maxconns=100000
        protocol=tars
        queuecap=50000
        queuetimeout=20000
        servant=chain0.agencyAgroup0node0BcosNodeService.PBFTServiceObj
        threads=8
      </chain0.agencyAgroup0node0BcosNodeService.PBFTServiceObjAdapter>
PBFT module listening port: 40404
Ledger
 <chain0.agencyAgroup0node0BcosNodeService.LedgerServiceObjAdapter>
        allow
        endpoint=tcp -h 127.0.0.1 -p 40405 -t 60000
        maxconns=100000
        protocol=tars
        queuecap=50000
        queuetimeout=20000
        servant=chain0.agencyAgroup0node0BcosNodeService.LedgerServiceObj
        threads=8
      </chain0.agencyAgroup0node0BcosNodeService.LedgerServiceObjAdapter>
Ledger module listening port: 40405
Front
<chain0.agencyAgroup0node0BcosNodeService.FrontServiceObjAdapter>
        allow
        endpoint=tcp -h 127.0.0.1 -p 40406 -t 60000
        maxconns=100000
        protocol=tars
        queuecap=50000
        queuetimeout=20000
        servant=chain0.agencyAgroup0node0BcosNodeService.FrontServiceObj
        threads=8
      </chain0.agencyAgroup0node0BcosNodeService.FrontServiceObjAdapter>
Front module listening port: 40406
注意:
Modify the listening port of ‘tars’ inside the service. You can modify the configurations of ‘config.toml’, ‘[[agency.group]] [[agency.group.node]] tars _ listen _ ip’ and ‘tars _ listen _ port’ during build
The node service needs to allocate five consecutive ports. The range is [tars _ listen _ port, tars _ listen _ port+4], please note the port conflict
[[agency.group]]
        group_id = "group0"
        [[agency.group.node]]
        # node name, Notice: node_name in the same agency and group must be unique
        node_name = "node0"
        deploy_ip = "127.0.0.1"
        # node tars server listen ip
        tars_listen_ip="0.0.0.0"        # Modify the listening IP address of tars
        # node tars server listen port, Notice: the tars server of the node will cost five ports, then the port tars_listen_port ~ tars_listen_port + 4 should be in free
        tars_listen_port=40402          # modify the tars listening port
        # enable data disk encryption for bcos node or not, default is false
        enable_storage_security = false
        # url of the key center, in format of ip:port, please refer to https://github.com/FISCO-BCOS/key-manager for details
        # key_center_url =
        # cipher_data_key =
        monitor_listen_port = "3902"
        # monitor log path example:"/home/fisco/tars/framework/app_log/"
        monitor_log_path = ""
tars_proxy.ini
tars client connection information
$ cat generated/chain0/agencyA_tars_proxy.ini
[rpc]
proxy.0 = 127.0.0.1:40400

[gateway]
proxy.0 = 127.0.0.1:40401

[txpool]
proxy.0 = 127.0.0.1:40402

[scheduler]
proxy.0 = 127.0.0.1:40403

[pbft]
proxy.0 = 127.0.0.1:40404

[ledger]
proxy.0 = 127.0.0.1:40405

[front]
proxy.0 = 127.0.0.1:40406
Example:
[rpc]
proxy.0 = 127.0.0.1:40400
The preceding configuration indicates that if the internal module of the service needs to communicate with the rpc module, the endpoint used is’ 127.0.0.1:40400`
注意:
‘tars _ proxy.ini’ recommendations for various services within the organization are consistent
A new file is generated for the service that is being expanded during expansion. You need to merge the newly generated ‘institution name _ tars _ proxy.ini’ into the used ‘tars _ proxy.ini’ file and synchronize it to all services. The service needs to be restarted and take effect. Otherwise, the newly expanded service cannot be connected to the existing environment
Before performing this operation, please make sure that the above ports of the machine are not occupied。
# Enter the operation directory
cd ~/fisco/BcosBuilder/pro

# Copy configuration from conf directory
cp conf/config-build-example.toml config.toml
The copied ‘config.toml’ is the configuration file used by the entire ‘BcosBuilder’. For more information, please refer to the following link: Introduction to Configuration。
python3 build_chain.py build -c config.toml -O ./generated
After executing the above command, the output ‘* build tars install package output dir : . / generated ‘and no other errors are reported, the installation package is successfully built:
=========================================================
* output dir: ./generated
* Don't load tars token and url
* args type: all
* generate config for the rpc service, build opr: True
----------- * generate config for the rpc service agencyABcosRpcService -----------
* generate config.ini for the rpc service agencyABcosRpcService
* store ./generated/127.0.0.1/rpc_20200/conf/config.ini
* generate config.ini for the rpc service agencyABcosRpcService success
* generate cert for the rpc service agencyABcosRpcService
* generate cert, ip: 127.0.0.1, output path: ./generated/127.0.0.1/rpc_20200/conf
* generate sdk cert, output path: ./generated/127.0.0.1/rpc_20200/conf
* generate cert for the rpc service agencyABcosRpcService success
----------- * generate config for the rpc service successagencyABcosRpcService -----------
* generate tars install package for BcosRpcService:agencyABcosRpcService:agencyA:chain0:rpc:binary/
----------- * generate config for the rpc service agencyBBcosRpcService -----------
* generate config.ini for the rpc service agencyBBcosRpcService
* store ./generated/127.0.0.1/rpc_20201/conf/config.ini
* generate config.ini for the rpc service agencyBBcosRpcService success
* generate cert for the rpc service agencyBBcosRpcService
* generate cert, ip: 127.0.0.1, output path: ./generated/127.0.0.1/rpc_20201/conf
* generate sdk cert, output path: ./generated/127.0.0.1/rpc_20201/conf
* generate cert for the rpc service agencyBBcosRpcService success
----------- * generate config for the rpc service successagencyBBcosRpcService -----------
* generate tars install package for BcosRpcService:agencyBBcosRpcService:agencyB:chain0:rpc:binary/
* generate config for the rpc service success
* generate config for the gateway service, build opr: True
----------- * generate config for the p2p service agencyABcosGatewayService -----------
* generate config.ini for the p2p service agencyABcosGatewayService
* store ./generated/127.0.0.1/gateway_30300/conf/config.ini
* generate config.ini for the p2p service agencyABcosGatewayService success
* generate cert for the p2p service agencyABcosGatewayService
* generate cert, ip: 127.0.0.1, output path: ./generated/127.0.0.1/gateway_30300/conf
* generate cert for the p2p service agencyABcosGatewayService success
----------- * generate config for the p2p service successagencyABcosGatewayService -----------
* generate gateway connection file: ./generated/127.0.0.1/gateway_30300/conf/nodes.json
* generate tars install package for BcosGatewayService:agencyABcosGatewayService:agencyA:chain0:gateway:binary/
----------- * generate config for the p2p service agencyBBcosGatewayService -----------
* generate config.ini for the p2p service agencyBBcosGatewayService
* store ./generated/127.0.0.1/gateway_30301/conf/config.ini
* generate config.ini for the p2p service agencyBBcosGatewayService success
* generate cert for the p2p service agencyBBcosGatewayService
* generate cert, ip: 127.0.0.1, output path: ./generated/127.0.0.1/gateway_30301/conf
* generate cert for the p2p service agencyBBcosGatewayService success
----------- * generate config for the p2p service successagencyBBcosGatewayService -----------
* generate gateway connection file: ./generated/127.0.0.1/gateway_30301/conf/nodes.json
* generate tars install package for BcosGatewayService:agencyBBcosGatewayService:agencyB:chain0:gateway:binary/
* generate config for the gateway service success
----------- generate genesis config for group group0 -----------
* generate pem file for agencyAgroup0node0BcosNodeService
 - pem_path: ./generated/chain0/group0/agencyAgroup0node0BcosNodeService/node.pem
 - node_id_path: ./generated/chain0/group0/agencyAgroup0node0BcosNodeService/node.nodeid
 - node_id: 728cbaebdc8e70ee21d22a9049fe5a7ae73ffe98f8013151c4e826e4f49fb8fc5379617747852449f571ed5fdb64321342baa33cf55f288f1651dd7d67f35374

 - sm_crypto: 0
* generate pem file for agencyBgroup0node0BcosNodeService
 - pem_path: ./generated/chain0/group0/agencyBgroup0node0BcosNodeService/node.pem
 - node_id_path: ./generated/chain0/group0/agencyBgroup0node0BcosNodeService/node.nodeid
 - node_id: ec78eddc1c8bdc109fd3ccf189ade1b4207e2f45bb9de5742cd8881de4348c42c4e1397f9462cb94e23f2130787bdbda7bcd3d73bad84f79b86a8c103bd34d8e

 - sm_crypto: 0
* generate genesis config nodeid
* chain_id: group0
* group_id: chain0
* consensus_type: pbft
* block_tx_count_limit: 1000
* leader_period: 1
* gas_limit: 3000000000
* compatibility_version: 3.6.0
* generate_genesis_config_nodeid success
* store genesis config for chain0.group0
  path: ./generated/chain0/group0/config.genesis
* store genesis config for chain0.group0 success
* store genesis config for agencyAgroup0node0BcosNodeService
  path: ./generated/chain0/group0/agencyAgroup0node0BcosNodeService/config.genesis
* store genesis config for agencyAgroup0node0BcosNodeService success
* store genesis config for agencyBgroup0node0BcosNodeService
  path: ./generated/chain0/group0/agencyBgroup0node0BcosNodeService/config.genesis
* store genesis config for agencyBgroup0node0BcosNodeService success
----------- generate genesis config for group0 success -----------
----------- generate ini config for group group0 -----------
* store ini config for agencyAgroup0node0BcosNodeService
  path: ./generated/chain0/group0/agencyAgroup0node0BcosNodeService/config.ini
* store ini config for agencyAgroup0node0BcosNodeService success
* store ini config for agencyBgroup0node0BcosNodeService
  path: ./generated/chain0/group0/agencyBgroup0node0BcosNodeService/config.ini
* store ini config for agencyBgroup0node0BcosNodeService success
----------- generate ini config for group group0 success -----------
 * generate node install package for deploy_ip: 127.0.0.1:./generated/127.0.0.1/group0_node_40402:agencyAgroup0node0BcosNodeService
=> base_dir: ./generated/127.0.0.1/group0_node_40402
* generate tars node install package service: agencyAgroup0node0BcosNodeService, chain id: chain0, tars pkg dir: binary/
* generate tars install package for BcosNodeService:agencyAgroup0node0BcosNodeService:agencyA:chain0:node:binary/
 * generate node install package for deploy_ip: 127.0.0.1:./generated/127.0.0.1/group0_node_40412:agencyBgroup0node0BcosNodeService
=> base_dir: ./generated/127.0.0.1/group0_node_40412
* generate tars node install package service: agencyBgroup0node0BcosNodeService, chain id: chain0, tars pkg dir: binary/
* generate tars install package for BcosNodeService:agencyBgroup0node0BcosNodeService:agencyB:chain0:node:binary/
* copy tars_proxy.ini: ./generated/chain0/agencyA_tars_proxy.ini ,dir: ./generated/127.0.0.1/rpc_20200/conf
* copy tars_proxy.ini: ./generated/chain0/agencyB_tars_proxy.ini ,dir: ./generated/127.0.0.1/rpc_20201/conf
* copy tars_proxy.ini: ./generated/chain0/agencyA_tars_proxy.ini ,dir: ./generated/127.0.0.1/gateway_30300/conf
* copy tars_proxy.ini: ./generated/chain0/agencyB_tars_proxy.ini ,dir: ./generated/127.0.0.1/gateway_30301/conf
* copy node tars_proxy.ini: ./generated/chain0/agencyA_tars_proxy.ini ,dir: ./generated/127.0.0.1/group0_node_40402
* copy node tars_proxy.ini: ./generated/chain0/agencyB_tars_proxy.ini ,dir: ./generated/127.0.0.1/group0_node_40412
==========================================================
* build tars install package output dir : ./generated
The configuration related to the service installation package generated during the build process is located in the ‘generated /’ directory, as follows:
$ tree generated/
generated
├── 127.0.0.1
│   ├── gateway_30300  # Gateway Service Directory
│   │   ├── BcosGatewayService  # Executable Program
│   │   ├── conf                # Configuration Directory
│   │   │   ├── ca.crt          # Root Certificate
│   │   │   ├── cert.cnf        # Certificate Profile
│   │   │   ├── config.ini      # Profile
│   │   │   ├── nodes.json      # p2p connection profile
│   │   │   ├── ssl.crt         # ssl certificate for p2p network connection between gateways
│   │   │   ├── ssl.key         # ssl certificate private key
│   │   │   ├── ssl.nodeid
│   │   │   ├── tars.conf       # For more information about the configuration of the tars.conf server, see Tars.conf
│   │   │   └── tars_proxy.ini  # For details about the configuration of the tars client connection, see the configuration description of tars _ proxy.ini
│   │   ├── start.sh  # Startup Script
│   │   └── stop.sh   # Stop Script
│   ├── gateway_30301 # Gateway Service Directory
│   │   ├── BcosGatewayService  # Executable Program
│   │   ├── conf                # Configuration Directory
│   │   │   ├── ca.crt          # Root Certificate
│   │   │   ├── cert.cnf        # Certificate Profile
│   │   │   ├── config.ini      # Profile
│   │   │   ├── nodes.json      # p2p connection profile
│   │   │   ├── ssl.crt         # ssl certificate for p2p network connection between gateways
│   │   │   ├── ssl.key         # ssl certificate private key
│   │   │   ├── ssl.nodeid
│   │   │   ├── tars.conf       # For more information about the configuration of the tars.conf server, see Tars.conf
│   │   │   └── tars_proxy.ini  # For details about the configuration of the tars client connection, see the configuration description of tars _ proxy.ini
│   │   ├── start.sh  # Startup Script
│   │   └── stop.sh   # Stop Script
│   ├── group0_node_40402   # Node Service Directory
│   │   ├── BcosNodeService     # Executable Program
│   │   ├── conf                # Configuration Directory
│   │   │   ├── config.genesis  # Blockchain Node Genesis Block File
│   │   │   ├── config.ini      # Profile
│   │   │   ├── node.nodeid     # node nodeid
│   │   │   ├── node.pem        # Private key file, consensus module for message signing, verification
│   │   │   ├── tars.conf       # For more information about the configuration of the tars.conf server, see Tars.conf
│   │   │   └── tars_proxy.ini  # For details about the configuration of the tars client connection, see the configuration description of tars _ proxy.ini
│   │   ├── start.sh  # Startup Script
│   │   └── stop.sh   # Stop Script
│   ├── group0_node_40412   # Node Service Directory
│   │   ├── BcosNodeService     # Executable Program
│   │   ├── conf                # Configuration Directory
│   │   │   ├── config.genesis  # Blockchain Node Genesis Block File
│   │   │   ├── config.ini      # Profile
│   │   │   ├── node.nodeid     # node nodeid
│   │   │   ├── node.pem        # Private key file, consensus module for message signing, verification
│   │   │   ├── tars.conf       # For more information about the configuration of the tars.conf server, see Tars.conf
│   │   │   └── tars_proxy.ini  # For details about the configuration of the tars client connection, see the configuration description of tars _ proxy.ini
│   │   ├── start.sh  # Startup Script
│   │   └── stop.sh   # Stop Script
│   ├── rpc_20200           # RPC Service Directory
│   │   ├── BcosRpcService      # Executable Program
│   │   ├── conf                # Configuration Directory
│   │   │   ├── ca.crt          # RPC Root Certificate
│   │   │   ├── cert.cnf        # Certificate Profile
│   │   │   ├── config.ini      # Profile
│   │   │   ├── sdk             # SDK certificate directory, used for SSL connection between rpc and sdk, these files need to be copied when sdk connects to rpc service
│   │   │   │   ├── ca.crt
│   │   │   │   ├── cert.cnf
│   │   │   │   ├── sdk.crt
│   │   │   │   ├── sdk.key
│   │   │   │   └── sdk.nodeid
│   │   │   ├── ssl.crt         # ssl certificate for network connection between rpc and sdk
│   │   │   ├── ssl.key         # ssl certificate private key
│   │   │   ├── ssl.nodeid
│   │   │   ├── tars.conf       # For more information about the configuration of the tars.conf server, see Tars.conf
│   │   │   └── tars_proxy.ini  # For details about the configuration of the tars client connection, see the configuration description of tars _ proxy.ini
│   │   ├── start.sh    # Startup Script
│   │   └── stop.sh     # Stop Script
│   ├── rpc_20201         # RPC Service Directory
│   │   ├── BcosRpcService      # Executable Program
│   │   ├── conf                # Configuration Directory
│   │   │   ├── ca.crt          # RPC Root Certificate
│   │   │   ├── cert.cnf        # Certificate Profile
│   │   │   ├── config.ini      # Profile
│   │   │   ├── sdk             # SDK certificate directory, used for SSL connection between rpc and sdk, these files need to be copied when sdk connects to rpc service
│   │   │   │   ├── ca.crt
│   │   │   │   ├── cert.cnf
│   │   │   │   ├── sdk.crt
│   │   │   │   ├── sdk.key
│   │   │   │   └── sdk.nodeid
│   │   │   ├── ssl.crt         # ssl certificate for network connection between rpc and sdk
│   │   │   ├── ssl.key         # ssl certificate private key
│   │   │   ├── ssl.nodeid
│   │   │   ├── tars.conf       # For more information about the configuration of the tars.conf server, see Tars.conf
│   │   │   └── tars_proxy.ini  # For details about the configuration of the tars client connection, see the configuration description of tars _ proxy.ini
│   │   ├── start.sh    # Startup Script
│   │   └── stop.sh     # Stop Script
│   ├── start_all.sh        # Start script to start all service nodes
│   └── stop_all.sh         # Stop script to stop all service nodes
├── chain0
│   ├── agencyA_tars_proxy.ini                # An additional backup of the agency A tars _ proxy.ini. The tars _ proxy.ini of each service node in the agency needs to be consistent. After the service node changes such as scaling up or scaling down, all services need to update the configuration file and restart
│   ├── agencyB_tars_proxy.ini                # Agency B extra backup of tars _ proxy.ini, each service node within the agency tars _ proxy.ini needs to be consistent, after the expansion or contraction of service node changes, all services need to update the configuration file, and then restart
│   └── group0
│       ├── agencyAgroup0node0BcosNodeService # node agencyAgroup0node0BcosNodeService
│       │   ├── config.genesis                  # The node creation block file, which is an important file. This file is required for node expansion in a group
│       │   ├── config.ini                      # The node configuration file, which is the same file as the node service conf / config.ini
│       │   ├── node.nodeid                     # Node nodeid, used when registering or exiting a node
│       │   └── node.pem                        # The node private key file. The consensus module is used for message signing and signature verification
│       ├── agencyBgroup0node0BcosNodeService # node agencyBgroup0node0BcosNodeService
│       │   ├── config.genesis                  # The node creation block file, which is required when new nodes are expanded in the group
│       │   ├── config.ini                      # The node configuration file, which is the same file as the node service conf / config.ini
│       │   ├── node.nodeid                     # Node nodeid, used when registering or exiting a node
│       │   └── node.pem                        # The node private key file. The consensus module is used for message signing and signature verification
│       └── config.genesis
├── gateway     # Gateway service root certificate directory, which is used to issue certificates for new gateway service nodes when they are expanded
│   └── chain0
│       └── ca
│           ├── ca.crt
│           ├── ca.key
│           ├── ca.srl
│           └── cert.cnf
└── rpc         # RPC service root certificate directory, which is used to issue certificates for new RPC service nodes for network connection between RPC services and sdks
    └── chain0
        └── ca
            ├── ca.crt
            ├── ca.key
            ├── ca.srl
            └── cert.cnf
3.4 Startup Services
注意: This example is a stand-alone environment, in the actual environment, the service division is on different machines, then you need to first copy the installation package to the corresponding machine, and then start the service。
$ cd generated/127.0.0.1
$ bash start_all.sh
try to start gateway_30300
try to start gateway_30301
try to start group0_node_40402
try to start group0_node_40412
try to start rpc_20200
try to start rpc_20201
 gateway_30300 start successfully pid=32749
 group0_node_40412 start successfully pid=32752
 gateway_30301 start successfully pid=32758
 group0_node_40402 start successfully pid=32760
 rpc_20200 start successfully pid=32759
 rpc_20201 start successfully pid=32761
Service started successfully。
4. Configure and use the console
The console is applicable to both the Pro version and the Air version of the FISCO BCOS blockchain, and the experience is completely consistent。After the Pro version blockchain experience environment is built, you can configure and use the console to send transactions to the Pro version blockchain。
4.1 Installation Dependencies
Note
-For console configuration methods and commands, please refer to ‘here<../../develop/console/console_config.html>`_
Before using the console, you need to install the java environment:
# Ubuntu system installation java
sudo apt install -y default-jdk

#Centos system installed java
sudo yum install -y java java-devel
4.2 Download, configure, and use the console
Step 1: Download the Console
cd ~/fisco && curl -LO https://github.com/FISCO-BCOS/console/releases/download/v3.6.0/download_console.sh && bash download_console.sh
Note
-If you cannot download for a long time due to network problems, please try ‘cd ~ / fisco & & curl-#LO https://gitee.com/FISCO-BCOS/console/raw/master/tools/download_console.sh && bash download_console.sh`
Step 2: Configure the Console
Copy console configuration file
If the RPC service does not use the default port, replace 20200 in the file with the RPC service listening port。
# The latest version of the console uses the following command to copy the configuration file
cp -n console/conf/config-example.toml console/conf/config.toml
Configure console certificates
# All SDK certificate paths can be found through the command find.-name sdk
cp BcosBuilder/pro/generated/127.0.0.1/rpc_20200/conf/sdk/* console/conf/
Step 3: Launch and use the console
cd ~/fisco/console && bash start.sh
The output indicates that the startup is successful. Otherwise, check whether the node port configuration in conf / config.toml is correct and whether the SDK certificate is configured:
=============================================================================================
Welcome to FISCO BCOS console(3.6.0)!
Type 'help' or 'h' for help. Type 'quit' or 'q' to quit console.
 ________ ______  ______   ______   ______       _______   ______   ______   ______
|        |      \/      \ /      \ /      \     |       \ /      \ /      \ /      \
| $$$$$$$$\$$$$$|  $$$$$$|  $$$$$$|  $$$$$$\    | $$$$$$$|  $$$$$$|  $$$$$$|  $$$$$$\
| $$__     | $$ | $$___\$| $$   \$| $$  | $$    | $$__/ $| $$   \$| $$  | $| $$___\$$
| $$  \    | $$  \$$    \| $$     | $$  | $$    | $$    $| $$     | $$  | $$\$$    \
| $$$$$    | $$  _\$$$$$$| $$   __| $$  | $$    | $$$$$$$| $$   __| $$  | $$_\$$$$$$\
| $$      _| $$_|  \__| $| $$__/  | $$__/ $$    | $$__/ $| $$__/  | $$__/ $|  \__| $$
| $$     |   $$ \\$$    $$\$$    $$\$$    $$    | $$    $$\$$    $$\$$    $$\$$    $$
 \$$      \$$$$$$ \$$$$$$  \$$$$$$  \$$$$$$      \$$$$$$$  \$$$$$$  \$$$$$$  \$$$$$$

=============================================================================================
Get information with the console
# Get network connection information:
[group0]: /> getPeers
PeersInfo{
    p2pNodeID='3082010a0282010100ad0098dd754ad939046b84ac83ff699e44f48de82c0d192f9378eb48d04abcc28117c855cc979b0d1381484d8c138ba1d4c52fcbf3724397153aba39b622f20eecd699ddee8afcf52d2ec543dab89cbcb3557b68585874c80b6853d4a827b4dff1d5fa8d4836dd4bf8cff7853d6249bb49ad7f3ba30ebb6298c0e911c4bfd156cabe8007380b295101ebf289d94fb7bc88ad442138cfa912d274fe6ed29e7a895aa3f3d9e98ad1ffdf36f3af5926889897d72adbe64c875bec1199c99f1549cb939053778ed514d774b6c891cdd3b1c47a76920ae1b8430ed6f2b29bb0d5ae649b64a96132696517705e08148913bd8bda35cb1049087862c59ffd3a8a8f69a10203010001',
    endPoint='0.0.0.0:30300',
    groupNodeIDInfo=[
        NodeIDInfo{
            group='group0',
            nodeIDList=[
                17be1d488dc961090110c445f72fd97db655db31738d2c1f63a8f3be809085dacfb4df631e2af1ed086ad3b4c5c228050983b93f5e169ef38400ec08cc88381e
            ]
        }
    ],
    peers=[
        PeerInfo{
            p2pNodeID='3082010a0282010100cc342cc289d60ac66cc0e55e08ccda05ea19f440f667840876d14c9445fdb44d5ba7d9d86c9209d9b61a3915cfd7965b565d6f1500629a14519edbaafe744c11e0ac49f8858668f5c5f5e35f3c10734129308b71129d91218f9673649504ee6f2466ce494695daa120e5cf73785e0251ecd1126a1a7f1fe43842f47644394240e841fe19b73d2b1411c0459cdabc2c3beedd07cdc3acd64615493d9b043bab4c3864486ced0e22c24d82839ef3afc998dec933318ec0e7abb5413fc07638e3cc3f7286fdb274cfe257b07a748485b610971377bd02bb83abab12f4969e8822c73f03f3d0314648812bf20de2ca6bdc2f2c10aaf92bd71a62d392faa3104a2ec10203010001',
            endPoint='127.0.0.1:60765',
            groupNodeIDInfo=[
                NodeIDInfo{
                    group='group0',
                    nodeIDList=[
                        934ddb929c088767fcc0f3b8cf4e5469e46f6d8c33e4c732ef3af8f39940045701e2cea83b0260202361f6e6cb7d5b5a6e2f7d69b5147c03fc79835f1a10ec73
                    ]
                }
            ]
        }
    ]
}

# Obtaining Node List Information
[group0]: /> getGroupPeers
peer0: 17be1d488dc961090110c445f72fd97db655db31738d2c1f63a8f3be809085dacfb4df631e2af1ed086ad3b4c5c228050983b93f5e169ef38400ec08cc88381e
peer1: 934ddb929c088767fcc0f3b8cf4e5469e46f6d8c33e4c732ef3af8f39940045701e2cea83b0260202361f6e6cb7d5b5a6e2f7d69b5147c03fc79835f1a10ec73

[group0]: /> getSealerList
[
    Sealer{
        nodeID='17be1d488dc961090110c445f72fd97db655db31738d2c1f63a8f3be809085dacfb4df631e2af1ed086ad3b4c5c228050983b93f5e169ef38400ec08cc88381e',
        weight=1
    },
    Sealer{
        nodeID='934ddb929c088767fcc0f3b8cf4e5469e46f6d8c33e4c732ef3af8f39940045701e2cea83b0260202361f6e6cb7d5b5a6e2f7d69b5147c03fc79835f1a10ec73',
        weight=1
    }
]
4.3. Deploy and invoke contracts
Step 1: Write the HelloWorld contract
HelloWorld contract provides two interfaces’ get()’and’ set()’, used to get / set the contract variable’ name ‘, the contract content is as follows:
pragma solidity >=0.6.10 <0.8.20;
contract HelloWorld {
    string name;

    constructor() public {
        name = "Hello, World!";
    }

    function get() public view returns (string memory) {
        return name;
    }

    function set(string memory n) public {
        name = n;
    }
}
Step 2: Deploying HelloWorld Contracts
To facilitate the user’s quick experience, the HelloWorld contract is built into the console and located in the console directory ‘contracts / consolidation / HelloWorld.sol’
# Enter the following command in the console to return the contract address if the deployment is successful
[group0]: /> deploy HelloWorld
transaction hash: 0x011602b6376e2bc806f1da91e2c70b0410b4d422fdbd4c346619a75d8e17e9da
contract address: 0x6849f21d1e455e9f0712b1e99fa4fcd23758e8f1
currentAccount: 0xfbb8fed0ce5402b799514c8f0a00661426549623

# View current block height
[group0]: /> getBlockNumber
1
Step 3. Invoke the HelloWorld contract
# Call the get interface to get the name variable, where the contract address is the address returned by the deploy command
[group0]: /> call HelloWorld 0x6849f21d1e455e9f0712b1e99fa4fcd23758e8f1 get
---------------------------------------------------------------------------------------------
Return code: 0
description: transaction executed successfully
Return message: Success
---------------------------------------------------------------------------------------------
Return value size:1
Return types: (string)
Return values:(Hello, World!)
---------------------------------------------------------------------------------------------

# Check the current block height, the block height remains unchanged, because the get interface does not change the ledger status
[group0]: /> getBlockNumber
1

# Call the set method to set the name
[group0]: /> call HelloWorld 0x6849F21D1E455e9f0712b1e99Fa4FCD23758E8F1 set "Hello, FISCO BCOS"
transaction hash: 0x2f7c85c2c59a76ccaad85d95b09497ad05ca7983c5ec79c8f9d102d1c8dddc30
---------------------------------------------------------------------------------------------
transaction status: 0
description: transaction executed successfully
---------------------------------------------------------------------------------------------
Receipt message: Success
Return message: Success
Return value size:0
Return types: ()
Return values:()
---------------------------------------------------------------------------------------------
Event logs
Event: {}

# View the current block height, because the set interface has modified the ledger status and the block height has increased to 2
[group0]: /> getBlockNumber
2

# Exit Console
[group0]: /> exit
5 Expansion
After successfully building a blockchain network that does not rely on the tars console, this section describes how to scale up the rpc, gateway, and node。
5.1 Scaling the RPC / Gateway service (without relying on the tars console)
Take the RPC / Gateway service of the Pro version FISCO BCOS alliance chain as an example to help users master the service expansion of the Pro version FISCO BCOS blockchain without relying on the tars console。
5.1.1. Modify the expansion configuration
For more information about how to configure blockchain node service expansion, see the expansion template ‘conf / config-node-rpc-example.toml’ of ‘BcosBuilder’. The specific configuration steps are as follows:
# Enter the operation directory
cd ~/fisco/BcosBuilder
# Expansion configuration
cp conf/config-build-expand-rpc.toml config-expand-rpc.toml
cat config-expand-rpc.toml
[tars]
tars_pkg_dir = "binary/"

[chain]
chain_id="chain0"
# the rpc-service enable sm-ssl or not, default disable sm-ssl
rpc_sm_ssl=false
# the gateway-service enable sm-ssl or not, default disable sm-ssm
gateway_sm_ssl=false
# the existed rpc service ca path, will generate new ca if not configured
rpc_ca_cert_path=""
# the existed gateway service ca path, will generate new ca if not configured
#gateway_ca_cert_path="

[[agency]]
name = "agencyA"
# enable data disk encryption for rpc/gateway or not, default is false
enable_storage_security = false
# url of the key center, in format of ip:port, please refer to https://github.com/FISCO-BCOS/key-manager for details
# key_center_url =
# cipher_data_key =

    [agency.rpc]
    deploy_ip=["127.0.0.1"]
    # rpc listen ip
    listen_ip="0.0.0.0"
    # rpc listen port
    listen_port=20200
    thread_count=4
    # rpc tars server listen ip
    tars_listen_ip="0.0.0.0"
    # rpc tars server listen port
    tars_listen_port=40400
Modify configuration files as needed:
RPC root certificate path
rpc_ca_cert_path="generated/rpc/chain0/ca/"
Deploy server modifications
deploy_ip = "127.0.0.1"
modify rpc listening information
  listen_ip="0.0.0.0"
  listen_port=20202
-tars listening information modification
tars_listen_ip="0.0.0.0"
tars_listen_port=40420
5.1.2. Generate installation package
After the configuration modification is complete, use the following command to generate the installation package
python3 build_chain.py build -c config-expand-rpc.toml -t rpc -O ./expand/rpc
After executing the above command, the output ‘* build tars install package output dir : . / expand / rpc ‘and no other errors are reported, the installation package is built successfully
$ python3 build_chain.py build -c config-expand-rpc.toml -t rpc -O ./expand/rpc
=========================================================
* output dir: ./expand/rpc
* Don't load tars token and url
* args type: rpc
* generate config for the rpc service, build opr: True
----------- * generate config for the rpc service agencyABcosRpcService -----------
* generate config.ini for the rpc service agencyABcosRpcService
* store ./expand/rpc/127.0.0.1/rpc_20200/conf/config.ini
* generate config.ini for the rpc service agencyABcosRpcService success
* generate cert for the rpc service agencyABcosRpcService
* generate cert, ip: 127.0.0.1, output path: ./expand/rpc/127.0.0.1/rpc_20200/conf
* generate sdk cert, output path: ./expand/rpc/127.0.0.1/rpc_20200/conf
* generate cert for the rpc service agencyABcosRpcService success
----------- * generate config for the rpc service successagencyABcosRpcService -----------
* generate tars install package for BcosRpcService:agencyABcosRpcService:agencyA:chain0:rpc:binary/
* generate config for the rpc service success
* copy tars_proxy.ini: ./expand/rpc/chain0/agencyA_tars_proxy.ini ,dir: ./expand/rpc/127.0.0.1/rpc_20200/conf
=========================================================
* build tars install package output dir : ./expand/rpc
Generated installation package ‘. / expand / rpc /’
expand/rpc
├── 127.0.0.1
│   ├── rpc_20202         # RPC Service Directory
│   │   ├── BcosRpcService      # Executable Program
│   │   ├── conf                # Configuration Directory
│   │   │   ├── ca.crt          # RPC Root Certificate
│   │   │   ├── cert.cnf        # Certificate Profile
│   │   │   ├── config.ini      # Profile
│   │   │   ├── sdk             # SDK certificate directory, used for SSL connection between rpc and sdk, these files need to be copied when sdk connects to rpc service
│   │   │   │   ├── ca.crt
│   │   │   │   ├── cert.cnf
│   │   │   │   ├── sdk.crt
│   │   │   │   ├── sdk.key
│   │   │   │   └── sdk.nodeid
│   │   │   ├── ssl.crt         # ssl certificate for network connection between rpc and sdk
│   │   │   ├── ssl.key         # ssl certificate private key
│   │   │   ├── ssl.nodeid
│   │   │   ├── tars.conf       # For more information about the configuration of the tars.conf server, see Tars.conf
│   │   │   └── tars_proxy.ini  # For details about the configuration of the tars client connection, see the configuration description of tars _ proxy.ini
│   │   ├── start.sh    # Startup Script
│   │   └── stop.sh     # Stop Script
│   ├── start_all.sh
│   └── stop_all.sh
└── chain0
    └── agencyA_tars_proxy.ini # newly generated tars client connection configuration
5.1.3. Merging tars _ proxy.ini Files
Merge the tars _ proxy file using the ‘merge-config’ command
python3 build_chain.py merge-config --help
usage: build_chain.py merge-config [-h] -t TYPE -c CONFIG [CONFIG ...] -O OUTPUT

e.g:
python3 build_chain.py merge-config -t tars -c tars0.conf tars1.conf -O output_dir

options:
  -h, --help            show this help message and exit
  -t TYPE, --type TYPE  [Required] specify the type:
                        * type list: tars
  -c CONFIG [CONFIG ...], --config CONFIG [CONFIG ...]
                        [Required] the config files to be
  -O OUTPUT, --output OUTPUT
                        [Required] specify the output dir
-t/–type : The type of the merged configuration file. Currently, only the ‘tars’ type is supported -c/–config : Configuration list, list of configuration files to be merged -O/–output : Output Directory
python3 build_chain.py merge-config -t tars -c generated/chain0/agencyA_tars_proxy.ini expand/rpc/chain0/agencyA_tars_proxy.ini -O agencyA_tars_proxy
cat agencyA_tars_proxy/tars_proxy.ini
[gateway]
proxy.0 = 127.0.0.1:40401

[rpc]
proxy.0 = 127.0.0.1:40400
proxy.1 = 127.0.0.1:40420

[txpool]
proxy.0 = 127.0.0.1:40402
proxy.1 = 127.0.0.1:40422

[scheduler]
proxy.0 = 127.0.0.1:40403
proxy.1 = 127.0.0.1:40423

[pbft]
proxy.0 = 127.0.0.1:40404
proxy.1 = 127.0.0.1:40424

[ledger]
proxy.0 = 127.0.0.1:40405
proxy.1 = 127.0.0.1:40425

[front]
proxy.0 = 127.0.0.1:40406
proxy.1 = 127.0.0.1:40426
After the operation is successful, all the tars connection information is merged into the same file
5.1.4. Update tars _ proxy and restart the service
Update the tars _ proxy.ini file for all services in institution A
Includes existing services and expanded services。
cp -f agencyA_tars_proxy/tars_proxy.ini generated/127.0.0.1/gateway_30300/conf/
cp -f agencyA_tars_proxy/tars_proxy.ini generated/127.0.0.1/rpc_20200/conf
cp -f agencyA_tars_proxy/tars_proxy.ini generated/127.0.0.1/group0_node_40402/conf
cp -f agencyA_tars_proxy/tars_proxy.ini expand/rpc/127.0.0.1/rpc_20201/conf # Expanded Services
Restart service
$ cd ~/fisco/BcosBuilder/pro/
$ bash generated/127.0.0.1/stop_all.sh
try to stop gateway_30300
 stop BcosGatewayService success.
try to stop gateway_30301
 stop BcosGatewayService success.
try to stop group0_node_40402
 stop BcosNodeService success.
try to stop group0_node_40412
 stop BcosNodeService success.
try to stop rpc_20200
 stop BcosRpcService success.
try to stop rpc_20201
 stop BcosRpcService success.
$ cd ~/fisco/BcosBuilder/pro/
$ bash generated/127.0.0.1/start_all.sh
try to start gateway_30300
try to start gateway_30301
try to start group0_node_40402
try to start group0_node_40412
try to start rpc_20200
try to start rpc_20201
 gateway_30300 start successfully pid=75226
 group0_node_40402 start successfully pid=75235
 rpc_20200 start successfully pid=75238
 group0_node_40412 start successfully pid=75237
 gateway_30301 start successfully pid=75230
 rpc_20201 start successfully pid=75239
Start the expansion node
$ cd ~/fisco/BcosBuilder/pro/
bash expand/rpc/127.0.0.1/start_all.sh
try to start rpc_20202
 rpc_20202 start successfully pid=75529
5.1.5. Connect to the expanded RPC service through the console
5.1.5.1 Installation Dependencies
Note
-For console configuration methods and commands, please refer to ‘here<../../operation_and_maintenance/console/console_config.html>`_
Before using the console, you need to install the java environment:
# Ubuntu system installation java
sudo apt install -y default-jdk

#Centos system installed java
sudo yum install -y java java-devel
5.1.5.2 Download, configure, and use the console
Step 1: Download the Console
cd ~/fisco && curl -LO https://github.com/FISCO-BCOS/console/releases/download/v3.6.0/download_console.sh && bash download_console.sh
Note
-If you cannot download for a long time due to network problems, please try ‘cd ~ / fisco & & curl-#LO https://gitee.com/FISCO-BCOS/console/raw/master/tools/download_console.sh && bash download_console.sh`
Step 2: Configure the Console
Copy console configuration file
Replace the port with the port of the expanded RPC service
# The latest version of the console uses the following command to copy the configuration file
cp -n console/conf/config-example.toml console/conf/config.toml
peers=["127.0.0.1:20202"]
Configure console certificates
# All SDK certificate paths can be found through the command find.-name sdk
cp ~/fisco/BcosBuilder/pro/expand/rpc/127.0.0.1/rpc_20202/conf/sdk/* console/conf
Step 3: Launch and use the console
cd ~/fisco/console && bash start.sh
Step 4: Call Console
[group0]: /apps> deploy HelloWorld # Deployment contract
transaction hash: 0x98bd489a77f9531bc4ccade0a72c6cff6aa0ca1205d6e5fe391b2cc150443277
contract address: 0x33e56a083e135936c1144960a708c43a661706c0
currentAccount: 0x3e00116eaf82e440ef93da1ecc510471cb3c97de
[group0]: /apps> call HelloWorld 0x33e56a083e135936c1144960a708c43a661706c0 set "Hello,Fisco" #Call Contract
transaction hash: 0x30ac4d27c35fd3d5ca0f009ad195ec4c98e90bf72503879e7860e6a508acd614
---------------------------------------------------------------------------------------------
transaction status: 0
description: transaction executed successfully
---------------------------------------------------------------------------------------------
Receipt message: Success
Return message: Success
Return value size:0
Return types: ()
Return values:()
---------------------------------------------------------------------------------------------
5.2 Scale out the node service (does not rely on the tars console)
5.2.1. Modify the expansion configuration
For more information about how to configure blockchain node service expansion, see the expansion template ‘conf / config-node-expand-example.toml’ of ‘BcosBuilder’. The specific configuration steps are as follows:
# Enter the operation directory
cd ~/fisco/BcosBuilder
# Expansion configuration
cp conf/config-build-expand-node-example.toml config-expand-node.toml
cat config-expand-node.toml
[tars]
tars_pkg_dir = "binary/"

[chain]
chain_id="chain0"
# the rpc-service enable sm-ssl or not, default disable sm-ssl
rpc_sm_ssl=false
# the gateway-service enable sm-ssl or not, default disable sm-ssm
gateway_sm_ssl=false
# the existed rpc service ca path, will generate new ca if not configured
#rpc_ca_cert_path=""
# the existed gateway service ca path, will generate new ca if not configured
#gateway_ca_cert_path="

[[group]]
group_id="group0"
# the genesis configuration path of the group, will generate new genesis configuration if not configured
genesis_config_path = "./generated/chain0/group0/config.genesis"
# VM type, now only support evm/wasm
vm_type="evm"
# use sm-crypto or not
sm_crypto=false
# enable auth-check or not
auth_check=true
init_auth_address="0x241abd724d0d03aa3323679de3ed65a358e5b121"

# the genesis config
# the number of blocks generated by each leader
leader_period = 1
# the max number of transactions of a block
block_tx_count_limit = 1000
# consensus algorithm now support PBFT(consensus_type=pbft), rPBFT(consensus_type=rpbft)
consensus_type = "pbft"
# transaction gas limit
gas_limit = "3000000000"
# compatible version, can be dynamically upgraded through setSystemConfig
compatibility_version="3.6.0"

[[agency]]
name = "agencyA"
# enable data disk encryption for rpc/gateway or not, default is false
enable_storage_security = false
# url of the key center, in format of ip:port, please refer to https://github.com/FISCO-BCOS/key-manager for details
# key_center_url =
# cipher_data_key =

    [[agency.group]]
        group_id = "group0"
        [[agency.group.node]]
        # node name, Notice: node_name in the same agency and group must be unique
        node_name = "node2"
        deploy_ip = "127.0.0.1"
        # node tars server listen ip
        tars_listen_ip="0.0.0.0"
        # node tars server listen port, Notice: the tars server of the node will cost five ports, then the port tars_listen_port ~ tars_listen_port + 4 should be in free
        tars_listen_port=40422
        # enable data disk encryption for bcos node or not, default is false
        enable_storage_security = false
        # url of the key center, in format of ip:port, please refer to https://github.com/FISCO-BCOS/key-manager for details
        # key_center_url =
        # cipher_data_key =
        monitor_listen_port = "3902"
        # monitor log path example:"/home/fisco/tars/framework/app_log/"
        monitor_log_path = ""
Modify configuration files as needed:
Modify node name
Do not conflict with the existing node name
node_name = "node2"
Deploy server modifications
deploy_ip = "127.0.0.1"
Set Genesis block file path
genesis_config_path = "./generated/chain0/group0/config.genesis"
-tars listening information modification
tars_listen_ip="0.0.0.0"
tars_listen_port=40422
5.2.2. Generate installation package
After the configuration modification is complete, use the following command to generate the installation package
python3 build_chain.py build -c config-expand-node.toml -t node -O ./expand/node
After executing the above command, the output ‘* build tars install package output dir : . / expand / node ‘and no other errors are reported, the installation package is built successfully
$ python3 build_chain.py build -c config-expand-node.toml -t node -O ./expand/node
=========================================================
* output dir: ./expand/node
* Don't load tars token and url
* args type: node
----------- generate genesis config for group group0 -----------
* the genesis config file has been set, path: /Users/octopus/fisco/BcosBuilder/pro/generated/chain0/group0/config.genesis
* generate pem file for agencyAgroup0node2BcosNodeService
 - pem_path: ./expand/node/chain0/group0/agencyAgroup0node2BcosNodeService/node.pem
 - node_id_path: ./expand/node/chain0/group0/agencyAgroup0node2BcosNodeService/node.nodeid
 - node_id: 0ebd3916fa9e73736f64c6f84b4f55dfa0a714f26641eb9e171b0aa1975b99848a10805fbb12350434e81311008654d217a7aef9a854283d7868be10c3f21af9

 - sm_crypto: 0
* store genesis config for agencyAgroup0node2BcosNodeService
  path: ./expand/node/chain0/group0/agencyAgroup0node2BcosNodeService/config.genesis
* store genesis config for agencyAgroup0node2BcosNodeService success
----------- generate genesis config for group0 success -----------
----------- generate ini config for group group0 -----------
* store ini config for agencyAgroup0node2BcosNodeService
  path: ./expand/node/chain0/group0/agencyAgroup0node2BcosNodeService/config.ini
* store ini config for agencyAgroup0node2BcosNodeService success
----------- generate ini config for group group0 success -----------
 * generate node install package for deploy_ip: 127.0.0.1:./expand/node/127.0.0.1/group0_node_40422:agencyAgroup0node2BcosNodeService
=> base_dir: ./expand/node/127.0.0.1/group0_node_40422
* generate tars node install package service: agencyAgroup0node2BcosNodeService, chain id: chain0, tars pkg dir: binary/
* generate tars install package for BcosNodeService:agencyAgroup0node2BcosNodeService:agencyA:chain0:node:binary/
* copy node tars_proxy.ini: ./expand/node/chain0/agencyA_tars_proxy.ini ,dir: ./expand/node/127.0.0.1/group0_node_40422
=========================================================
* build tars install package output dir : ./expand/node
Generated installation package ‘. / expand / node /’
tree  expand/node/
expand/node/
├── 127.0.0.1
│   ├── group0_node_40422   # Node Directory
│   │   ├── BcosNodeService     # Executable Program
│   │   ├── conf                # Configuration Directory
│   │   │   ├── config.genesis  # Blockchain Node Genesis Block File
│   │   │   ├── config.ini      # Profile
│   │   │   ├── node.nodeid     # node nodeid
│   │   │   ├── node.pem        # Private key file, consensus module for message signing, verification
│   │   │   ├── tars.conf       # For more information about the configuration of the tars.conf server, see Tars.conf
│   │   │   └── tars_proxy.ini  # For details about the configuration of the tars client connection, see the configuration description of tars _ proxy.ini
│   │   ├── start.sh    # Startup Script
│   │   └── stop.sh     # Stop Script
│   ├── start_all.sh    # Start script to start all service nodes
│   └── stop_all.sh     # Stop script to stop all service nodes
└── chain0
    ├── agencyA_tars_proxy.ini  # newly generated tars client connection configuration
    └── group0
        └── agencyAgroup0node2BcosNodeService
            ├── config.genesis  # Blockchain Genesis Block File
            ├── config.ini      # the configuration file of the expansion node
            ├── node.nodeid     # nodeid of the scaling node
            └── node.pem        # Private key file of the scaling node
5.2.3. Merging tars _ proxy.ini Files
Merge the tars _ proxy file using the ‘merge-config’ command
python3 build_chain.py merge-config --help
usage: build_chain.py merge-config [-h] -t TYPE -c CONFIG [CONFIG ...] -O OUTPUT

e.g:
python3 build_chain.py merge-config -t tars -c tars0.conf tars1.conf -O output_dir

options:
  -h, --help            show this help message and exit
  -t TYPE, --type TYPE  [Required] specify the type:
                        * type list: tars
  -c CONFIG [CONFIG ...], --config CONFIG [CONFIG ...]
                        [Required] the config files to be
  -O OUTPUT, --output OUTPUT
                        [Required] specify the output dir
-t/–type : The type of the merged configuration file. Currently, only the ‘tars’ type is supported -c/–config : Configuration list, list of configuration files to be merged -O/–output : Output Directory
python3 build_chain.py merge-config -t tars -c generated/chain0/agencyA_tars_proxy.ini expand/node/chain0/agencyA_tars_proxy.ini -O agencyA_tars_proxy
cat agencyA_tars_proxy/tars_proxy.ini
[gateway]
proxy.0 = 127.0.0.1:40401

[rpc]
proxy.0 = 127.0.0.1:40400

[txpool]
proxy.0 = 127.0.0.1:40402
proxy.1 = 127.0.0.1:40422

[scheduler]
proxy.0 = 127.0.0.1:40403
proxy.1 = 127.0.0.1:40423

[pbft]
proxy.0 = 127.0.0.1:40404
proxy.1 = 127.0.0.1:40424

[ledger]
proxy.0 = 127.0.0.1:40405
proxy.1 = 127.0.0.1:40425

[front]
proxy.0 = 127.0.0.1:40406
proxy.1 = 127.0.0.1:40426
After the operation is successful, all the tars connection information is merged into the same file
5.2.4. Update tars _ proxy and restart the service
Update the tars _ proxy.ini file for all services in institution A
Includes existing services and expanded services。
cp -f agencyA_tars_proxy/tars_proxy.ini generated/127.0.0.1/gateway_30300/conf/
cp -f agencyA_tars_proxy/tars_proxy.ini generated/127.0.0.1/rpc_20200/conf
cp -f agencyA_tars_proxy/tars_proxy.ini generated/127.0.0.1/group0_node_40402/conf
cp -f agencyA_tars_proxy/tars_proxy.ini expand/node/127.0.0.1/group0_node_40422/conf # Expanded Services
Restart service
$ cd ~/fisco/BcosBuilder/pro/
$ bash generated/127.0.0.1/stop_all.sh
try to stop gateway_30300
 stop BcosGatewayService success.
try to stop gateway_30301
 stop BcosGatewayService success.
try to stop group0_node_40402
 stop BcosNodeService success.
try to stop group0_node_40412
 stop BcosNodeService success.
try to stop rpc_20200
 stop BcosRpcService success.
try to stop rpc_20201
 stop BcosRpcService success.
$ cd ~/fisco/BcosBuilder/pro/
$ bash generated/127.0.0.1/start_all.sh
try to start gateway_30300
try to start gateway_30301
try to start group0_node_40402
try to start group0_node_40412
try to start rpc_20200
try to start rpc_20201
 gateway_30300 start successfully pid=75226
 group0_node_40402 start successfully pid=75235
 rpc_20200 start successfully pid=75238
 group0_node_40412 start successfully pid=75237
 gateway_30301 start successfully pid=75230
 rpc_20201 start successfully pid=75239
Start the expansion node
$ cd ~/fisco/BcosBuilder/pro/
bash expand/node/127.0.0.1/start_all.sh
try to start group0_node_40422
 group0_node_40422 start successfully pid=75529
5.2.5. Add the new expansion node to the group
Note
When scaling a new node, we do not recommend that you add the node as a consensus node. You can add the node as a consensus node only when the block height of the scaling node is the same as the highest block height of the existing node in the chain。
Step 1: Obtain the NodeID of the scaling node
$ cd ~/fisco/BcosBuilder/pro/
$ cat expand/node/127.0.0.1/group0_node_40422/conf/node.nodeid
0ebd3916fa9e73736f64c6f84b4f55dfa0a714f26641eb9e171b0aa1975b99848a10805fbb12350434e81311008654d217a7aef9a854283d7868be10c3f21af9
After the new node is successfully scaled out, you can view the list of new nodes through the ‘getGroupPeers’ command in the console:
[group0]: /> getGroupPeers
[group0]: /apps> getGroupPeers
peer0: 17be1d488dc961090110c445f72fd97db655db31738d2c1f63a8f3be809085dacfb4df631e2af1ed086ad3b4c5c228050983b93f5e169ef38400ec08cc88381e
peer1: 934ddb929c088767fcc0f3b8cf4e5469e46f6d8c33e4c732ef3af8f39940045701e2cea83b0260202361f6e6cb7d5b5a6e2f7d69b5147c03fc79835f1a10ec73

[group0]: /> getSealerList
[
    Sealer{
        nodeID='17be1d488dc961090110c445f72fd97db655db31738d2c1f63a8f3be809085dacfb4df631e2af1ed086ad3b4c5c228050983b93f5e169ef38400ec08cc88381e',
        weight=1
    },
    Sealer{
        nodeID='934ddb929c088767fcc0f3b8cf4e5469e46f6d8c33e4c732ef3af8f39940045701e2cea83b0260202361f6e6cb7d5b5a6e2f7d69b5147c03fc79835f1a10ec73',
        weight=1
    }
]
[group0]: /> getObserverList  # Obtain the list of group observation nodes
[]
As can be seen from the console output, the nodeID is’ 0ebd3916fa9e73736f64c6f84b4f55dfa0a714f26641eb9e171b0a1975b99848a10805fbb12350434e81311008654d217a7aef9a854283d7868be10c3f
Step 2: Add an expansion node as an observation node
[group0]: /> addObserver 0ebd3916fa9e73736f64c6f84b4f55dfa0a714f26641eb9e171b0aa1975b99848a10805fbb12350434e81311008654d217a7aef9a854283d7868be10c3f21af9
{
    "code":0,
    "msg":"Success"
}

[group0]: /> getObserverList
[
    0ebd3916fa9e73736f64c6f84b4f55dfa0a714f26641eb9e171b0aa1975b99848a10805fbb12350434e81311008654d217a7aef9a854283d7868be10c3f21af9
]
Step 3: After the scaling node is synchronized to the highest block, add the scaling node as a consensus node
[group0]: /> addSealer 0ebd3916fa9e73736f64c6f84b4f55dfa0a714f26641eb9e171b0aa1975b99848a10805fbb12350434e81311008654d217a7aef9a854283d7868be10c3f21af9 1
{
    "code":0,
    "msg":"Success"
}

[group0]: /> getSealerList
[
    [
    Sealer{
        nodeID='17be1d488dc961090110c445f72fd97db655db31738d2c1f63a8f3be809085dacfb4df631e2af1ed086ad3b4c5c228050983b93f5e169ef38400ec08cc88381e',
        weight=1
    },
    Sealer{
        nodeID='934ddb929c088767fcc0f3b8cf4e5469e46f6d8c33e4c732ef3af8f39940045701e2cea83b0260202361f6e6cb7d5b5a6e2f7d69b5147c03fc79835f1a10ec73',
        weight=1
    },
    Sealer{
        nodeID='0ebd3916fa9e73736f64c6f84b4f55dfa0a714f26641eb9e171b0aa1975b99848a10805fbb12350434e81311008654d217a7aef9a854283d7868be10c3f21af9',
        weight=1
    }
]
Step 4: Deploy and invoke the contract
[group0]: /apps> deploy HelloWorld
transaction hash: 0x2255701e51fd5d38d357a5f294c11ff550ab6cc4a5e1b40237f2130b58e8ac59
contract address: 0x6546c3571f17858ea45575e7c6457dad03e53dbb
currentAccount: 0x3e00116eaf82e440ef93da1ecc510471cb3c97de

[group0]: /apps> call HelloWorld 0x6546c3571f17858ea45575e7c6457dad03e53dbb set "Hello,Fisco"
transaction hash: 0x4025cb4c87ae36f5caa4b6488df5c40530f4e1cb52d1d0abb4cb4242e16a4755
---------------------------------------------------------------------------------------------
transaction status: 0
description: transaction executed successfully
---------------------------------------------------------------------------------------------
Receipt message: Success
Return message: Success
Return value size:0
Return types: ()
Return values:()
---------------------------------------------------------------------------------------------

[group0]: /apps> call HelloWorld 0x6546c3571f17858ea45575e7c6457dad03e53dbb get
---------------------------------------------------------------------------------------------
Return code: 0
description: transaction executed successfully
Return message: Success
---------------------------------------------------------------------------------------------
Return value size:1
Return types: (STRING)
Return values:(Hello,Fisco)
---------------------------------------------------------------------------------------------