Manually Build a Pro Blockchain Network
Tags: “Pro version of the blockchain network” “deployment”
FISCO BCOS 3.x supports the Pro version of the microservice blockchain architecture. The Pro version of FISCO BCOS includes RPC services, Gateway services, and node services. Each service can be deployed and expanded independently。Please refer to hereUse supportedHardware and platformsConduct operation。
Note
Pro version FISCO BCOS uses the “BcosBuilder / pro” tool for chain building and expansion and other related operations, please refer to the introduction of this tool ‘BcosBuilder<./pro_builder.html>`_
FISCO BCOS 3.x builds and manages microservices based on tars. Before building the Pro version of FISCO BCOS, you need to install the tars service<https://doc.tarsyun.com/#/markdown/TarsCloud/TarsDocs/installation/README.md>`_
This chapter builds the tars service based on Docker. Make sure that the system user has the permission to operate docker and that the docker service is started
1. Installation Dependencies
The deployment tool ‘BcosBuilder’ depends on ‘python3, curl, docker, docker-compose’. Depending on the operating system you are using, use the following command to install the dependency。
Install Ubuntu Dependencies(Version not less than Ubuntu18.04)
sudo apt-get update
sudo apt-get install -y curl docker.io docker-compose python3 wget
Installing CentOS Dependencies(Version not less than CentOS 7)
sudo yum install -y curl docker docker-compose python3 python3-devel wget
Install macOS dependencies
brew install curl docker docker-compose python3 wget
2. Download the Pro version of the blockchain build tool BcosBuilder
Note
Deployment tool “BcosBuilder” configuration and use please refer to ‘here<./pro_builder.html>`_
If downloading the deployment tool “BcosBuilder” from github is too slow, please try: curl -#LO https://osp-1257653870.cos.ap-guangzhou.myqcloud.com/FISCO-BCOS/FISCO-BCOS/releases/v3.6.0/BcosBuilder.tgz && tar -xvf BcosBuilder.tgz
# Create action directory
mkdir -p ~/fisco && cd ~/fisco

# Download the Pro version of the blockchain build tool BcosBuilder
curl -#LO https://github.com/FISCO-BCOS/FISCO-BCOS/releases/download/v3.6.0/BcosBuilder.tgz && tar -xvf BcosBuilder.tgz

# Note: If the network speed is too slow, try the following command to download the deployment script:
curl -#LO https://osp-1257653870.cos.ap-guangzhou.myqcloud.com/FISCO-BCOS/FISCO-BCOS/releases/v3.6.0/BcosBuilder.tgz && tar -xvf BcosBuilder.tgz

# Install Build Tools Dependency Pack
cd BcosBuilder && pip3 install -r requirements.txt
3. Install, start, and configure the tars service
The Pro version of FISCO BCOS uses the tars service to build and manage microservices. The tars service mainly includes’ TarsFramework ‘and’ TarsNode ‘. For more information about the tars service, please refer to here.
‘BcosBuilder ‘provides the configuration of tars docker in’ bridge ‘and’ host ‘network modes. We recommend that you use the configuration of tars docker in’ bridge ‘network mode in the stand-alone version. We recommend that you use the configuration of tars docker in’ host ‘network mode in the production environment。
Docker configuration path of ‘bridge’ network mode: ‘docker / bridge’, where ‘docker / bridge / linux’ is used by linux users and ‘docker / bridge / mac’ is used by mac users
The docker configuration path of the ‘host’ network mode: ‘docker / host / linux’. Currently, only docker configurations for linux systems are provided
3.0 Configure Permission Mode
**Note:**If you do not need permission and the chain version is less than 3.3, you can skip this section。
Set ‘auth _ check’ of the configuration file to true and set the ‘init _ auth _ address’ field accordingly。The address specified by the ‘init _ auth _ address’ field here is generated by the following steps:
curl -#LO https://raw.githubusercontent.com/FISCO-BCOS/console/master/tools/get_account.sh && chmod u+x get_account.sh && bash get_account.sh
Note
-If you cannot download for a long time due to network problems, please try’curl-#LO https://osp-1257653870.cos.ap-guangzhou.myqcloud.com/FISCO-BCOS/FISCO-BCOS/tools/get_account.sh && chmod u+x get_account.sh && bash get_account.sh`
State secret version please use the following instruction to get the script
curl -#LO https://raw.githubusercontent.com/FISCO-BCOS/console/master/tools/get_gm_account.sh && chmod u+x get_gm_account.sh && bash get_gm_account.sh
Note
-If you cannot download for a long time due to network problems, please try’curl-#LO https://osp-1257653870.cos.ap-guangzhou.myqcloud.com/FISCO-BCOS/FISCO-BCOS/tools/get_gm_account.sh && chmod u+x get_gm_account.sh && bash get_gm_account.sh`
After the execution, there is the following output, using ‘init _ auth _ address’ is to use the following ‘Account Address’
[INFO] Account Address   : 0xd5eff0641c2f69a8deed9510e374aa3e94066a66
[INFO] Private Key (pem) : accounts/0xd5eff0641c2f69a8deed9510e374aa3e94066a66.pem
[INFO] Public  Key (pem) : accounts/0xd5eff0641c2f69a8deed9510e374aa3e94066a66.pem.pub
# enable auth-check or not
auth_check=true
init_auth_address="0xd5eff0641c2f69a8deed9510e374aa3e94066a66"
3.1 Installing / starting the tars service
Note
-Here, docker is used to install / start the tars service. Please make sure that the system user has the permission to operate docker and make sure that the docker service is in the startup state -After installing the tars service, it will take about a minute to pass the http://127.0.0.1:3000 / Visit tars Web Management Platform
Install the tars service: If you run the tars service for the first time, run the following command to install and start the tars service。
# Enter the BcosBuilder directory
cd ~/fisco/BcosBuilder/pro

# Note: It is necessary to ensure that the docker service is started
# Skip this step if you have done it before
# Create a bridge-type network tars-network with a network segment of 172.25.0.0 / 16
python3 build_chain.py create-subnet -n tars-network -s 172.25.0.0/16

# Note: It is necessary to ensure that the docker service is started
# Linux system: Enter the path to the docker configuration file(macOS system can skip this step)
cd ../docker/bridge/linux/framework
# macOS system: Go to docker profile path(Linux system can skip this step)
cd ../docker/bridge/mac/framework

# Configure the MYSQL password. It is assumed that the password is set to FISCO (Note: There are two MYSQL _ ROOT _ PASSWORD configuration items in the docker-compose.yml file。)
# Linux system(macOS system can skip this step)
sed -i 's/MYSQL_ROOT_PASSWORD: ""/MYSQL_ROOT_PASSWORD: "FISCO"/g' docker-compose.yml
# macOS System(Linux system can skip this step)
sed -i .bkp 's/MYSQL_ROOT_PASSWORD: ""/MYSQL_ROOT_PASSWORD: "FISCO"/g' docker-compose.yml

# create and start the tars management service
docker-compose up -d
Start the tars service: If the tars service has been installed before, run the following command to start the tars service directly。
# Enter the BcosBuilder directory
cd ~/fisco/BcosBuilder

# Note: It is necessary to ensure that the docker service is started
# Linux system: Enter the path to the docker configuration file(macOS system can skip this step)
cd docker/bridge/linux/framework
# macOS system: Go to docker profile path(Linux system can skip this step)
cd docker/bridge/mac/framework

# start the tars management service
docker-compose start
After the tars service is installed and started, the local environment can use http://127.0.0.1:3000 / access tars web management platform, cross-machine environment can be through http://{ip}:3000 / Access to the tars management platform, where ‘{ip}’Is the physical IP of the machine where the TarsFramework service is deployed。
3.2 Configure the tars service
Note
-tars service only needs to be configured once. If it has been configured before, it does not need to be reconfigured - In this step, you must apply for a token to obtain the operation permission of the blockchain service based on the tars service
After the initial installation of the tars management service, you need to configure the following:
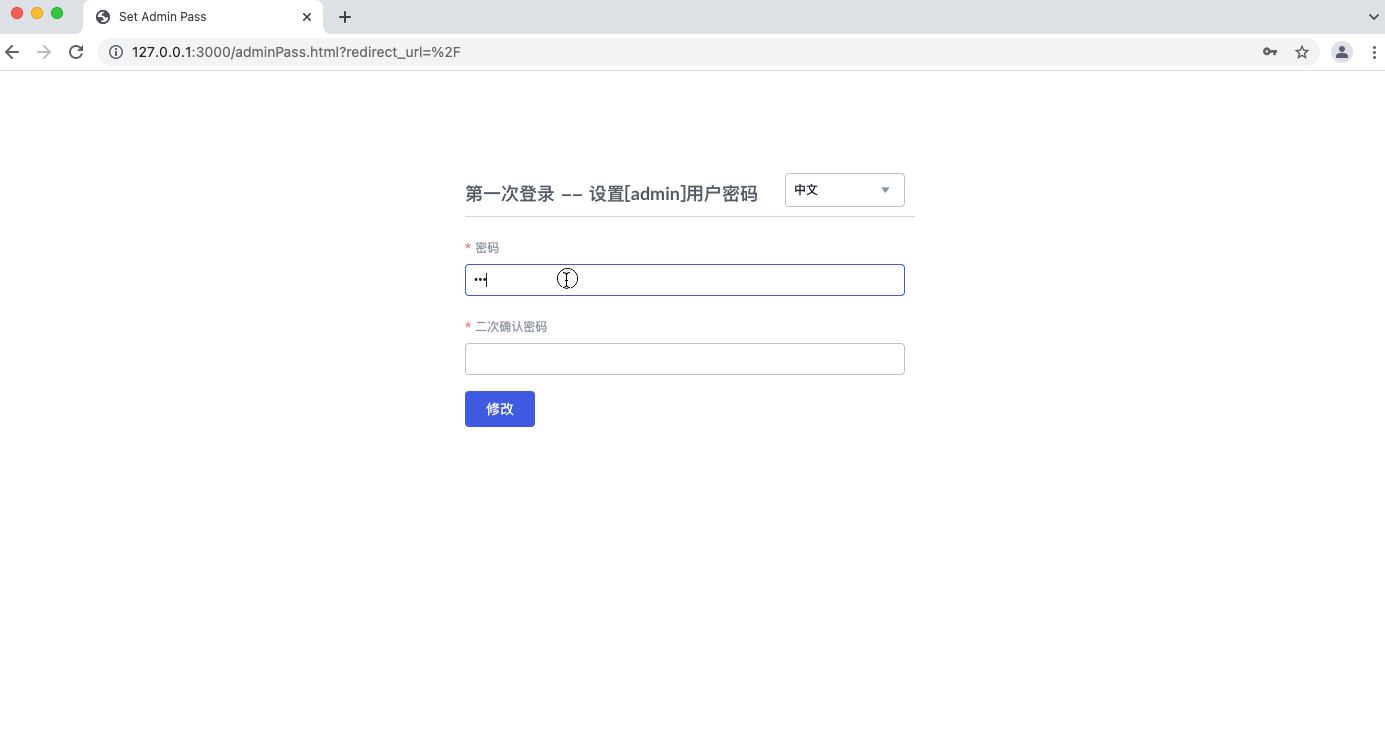
Login ConfigurationInitialize login password for administrator user ‘admin’。
Apply for tokenLog on to the tars web management platform to apply for a token for service construction and management。
For the first time using the tars management platform, enter the URL http://127.0.0.1:3000 /, refer to the following figure to initialize the administrator password and enter [admin] ->User Center ->[token management] apply for token。
4. Deploy Pro version blockchain nodes
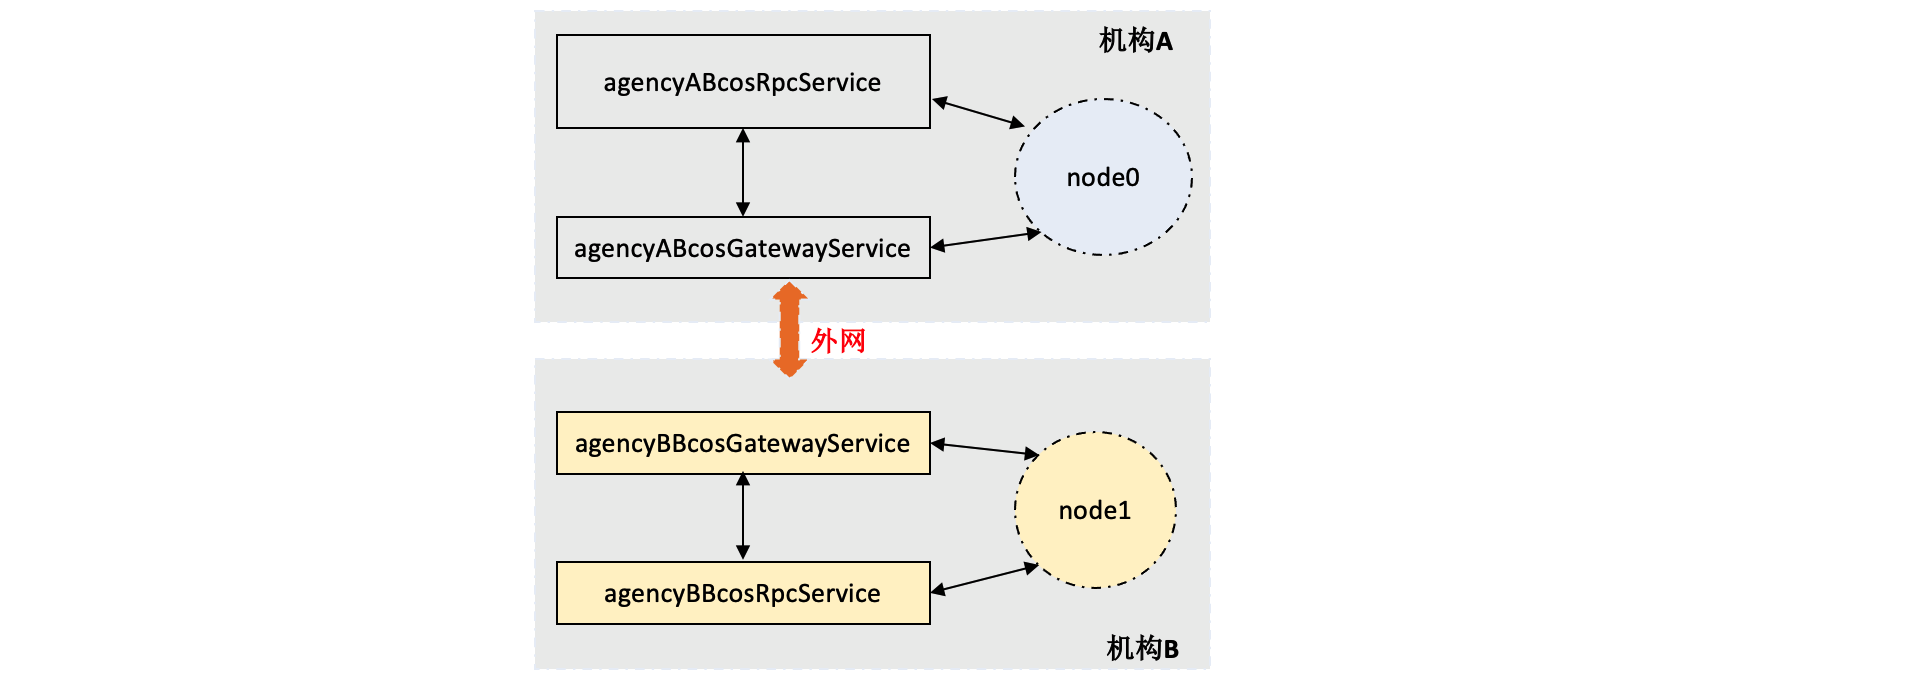
Pro version FISCO BCOS includes RPC service, Gateway service and blockchain node service BcosNodeService。
-RPC service: responsible for receiving client requests and forwarding the requests to nodes for processing, RPC service can be scaled horizontally, and one RPC service can access multiple blockchain node services
Gateway service: responsible for network communication between blockchain nodes across institutions. The Gateway service is horizontally scalable, and one Gateway service can access multiple blockchain node services
Blockchain node service ‘BcosNodeService’: Provides blockchain-related services, including consensus, execution, and transaction blockchain. The node service accesses RPC services and Gateway services to obtain network communication functions。
For the overall architecture design of Pro version FISCO BCOS, please refer to here。
This chapter introduces the Pro version FISCO BCOS deployment process by taking the deployment of a 2-mechanism 2-node blockchain service on a single machine as an example. The corresponding service networking mode is as follows:
Note
If you do not apply for a token, refer to [3.2 Configuring Tars Service] to apply for a token
If you forget to access the token of the tars service, you can use the [admin] of the tars web management platform ->User Center ->[token management] obtaining the token list
-Before deploying the Pro version blockchain node, please make sure that your tars service is in the started state. Please refer to Section 3.2 for installing / starting and configuring the tars service
4.1 Download Binary
Before building the Pro version of FISCO BCOS, you need to download the binary package. BcosBuilder provides a static binary package download function based on Linux, which can be deployed to ‘tarsnode’. The command to download the latest binary is as follows:
Note
You can view the deployment script usage through “python3 build _ chain.py -h”
binary is downloaded to the “binary” directory by default
If downloading binary is slow, please try:
python3 build_chain.py download_binary -t cdn
# Enter the operation directory
cd ~/fisco/BcosBuilder/pro

# Run the build _ chain.py script to download the binary. The binary package is downloaded to the binary directory by default
python3 build_chain.py download_binary
4.2 Deploying RPC Services
Run the following command in the BcosBuilder directory to deploy and start two RPC services. The corresponding RPC service names are ‘agencyABcosRpcService’ and ‘agencyBBcosRpcService’, the ip address is’ 172.25.0.3 ‘, and the listening ports are’ 20200 ‘and’ 20201’(Before performing this operation, please make sure that the ‘20200’ and ‘20201’ ports of the machine are not occupied)。
# Enter the operation directory
cd ~/fisco/BcosBuilder/pro

# Copy configuration from conf directory
cp conf/config-deploy-example.toml config.toml
The copied ‘config.toml’ is the configuration file used by the entire ‘BcosBuilder’. For more information, please refer to the following link: Introduction to Configuration。
# Configure the token generated in step 3.2 to the tars _ token field of config.toml
# The token generated here is eyJhbGciOiJIUzI1NiIsInR5cCI6IkpXVCJ9.eyJ1aWQiOiJhZG1pbiIsImlhdCI6MTYzODQzMTY1NSwiZXhwIjoxNjY3MJAyODU1fQ.430Actual
# Linux system(macOS system Skip this step):
sed -i 's/tars_token = ""/tars_token = "eyJhbGciOiJIUzI1NiIsInR5cCI6IkpXVCJ9.eyJ1aWQiOiJhZG1pbiIsImlhdCI6MTYzODQzMTY1NSwiZXhwIjoxNjY3MjAyODU1fQ.430ni50xWPJXgJdckpOTktJB3kAMNwFdl8w_GIP_3Ls"/g' config.toml
# macos system(Linux system skips this step):
sed -i .bkp 's/tars_token = ""/tars_token = "eyJhbGciOiJIUzI1NiIsInR5cCI6IkpXVCJ9.eyJ1aWQiOiJhZG1pbiIsImlhdCI6MTYzODQzMTY1NSwiZXhwIjoxNjY3MjAyODU1fQ.430ni50xWPJXgJdckpOTktJB3kAMNwFdl8w_GIP_3Ls"/g' config.toml

#Deploy and start the RPC service
python3 build_chain.py chain -o deploy -t rpc
After the preceding command is executed, when the script outputs’ deploy service success, type: rpc ‘, the RPC service is successfully deployed. The detailed log output is as follows:
=========================================================
----------- deploy service, type: rpc -----------
=========================================================
----------- generate service config -----------
* generate service config for 172.25.0.3 : agencyABcosRpcService
* generate config for the rpc service
* generate generated/rpc/chain0/172.25.0.3/agencyABcosRpcService/config.ini.tmp
* generate cert, output path: generated/rpc/chain0/172.25.0.3/agencyABcosRpcService
* generate sdk cert, output path: generated/rpc/chain0/172.25.0.3/agencyABcosRpcService
* generate config for the rpc service success
gen configuration for service agencyABcosRpcService success
* generate service config for 172.25.0.3 : agencyBBcosRpcService
* generate config for the rpc service
* generate generated/rpc/chain0/172.25.0.3/agencyBBcosRpcService/config.ini.tmp
* generate cert, output path: generated/rpc/chain0/172.25.0.3/agencyBBcosRpcService
* generate sdk cert, output path: generated/rpc/chain0/172.25.0.3/agencyBBcosRpcService
* generate config for the rpc service success
gen configuration for service agencyBBcosRpcService success
----------- generate service config success -----------
=========================================================
deploy_service to 172.25.0.3, app: chain0, name: agencyABcosRpcService
deploy service agencyABcosRpcService
* add config for service agencyABcosRpcService, node: 172.25.0.3, config: ca.crt
* add config for service agencyABcosRpcService, node: 172.25.0.3, config: ssl.key
* add config for service agencyABcosRpcService, node: 172.25.0.3, config: ssl.crt
* add config for service agencyABcosRpcService, node: 172.25.0.3, config: config.ini
upload tar package generated/./agencyABcosRpcService.tgz success, config id: 14
deploy_service to 172.25.0.3, app: chain0, name: agencyBBcosRpcService
deploy service agencyBBcosRpcService
* add config for service agencyBBcosRpcService, node: 172.25.0.3, config: ca.crt
* add config for service agencyBBcosRpcService, node: 172.25.0.3, config: ssl.key
* add config for service agencyBBcosRpcService, node: 172.25.0.3, config: ssl.crt
* add config for service agencyBBcosRpcService, node: 172.25.0.3, config: config.ini
upload tar package generated/./agencyBBcosRpcService.tgz success, config id: 15
----------- deploy service success, type: rpc -----------
=========================================================
RPC service-related configuration generated during deployment is located at ‘generated / rpc / ${chainID}’Directory, as follows:
$ tree generated/rpc/chain0
generated/rpc/chain0
├── 172.25.0.3
│   ├── agencyABcosRpcService # RPC Service Directory for Institution A
│   │   ├── config.ini.tmp    # Configuration file for RPC service of institution A
│   │   ├── sdk               # The SDK certificate directory. The SDK client can copy certificates from this directory to connect to the RPC service
│   │   │   ├── ca.crt
│   │   │   ├── cert.cnf
│   │   │   ├── sdk.crt
│   │   │   └── sdk.key
│   │   └── ssl               # RPC Service Certificate Directory
│   │       ├── ca.crt
│   │       ├── cert.cnf
│   │       ├── ssl.crt
│   │       └── ssl.key
│   └── agencyBBcosRpcService # RPC Service Configuration Directory for Institution B
│       ├── config.ini.tmp    # Configuration file for RPC service of institution B
│       ├── sdk               # The SDK certificate directory. The SDK client copies the certificate from this directory to connect to the RPC service
│       │   ├── ca.crt
│       │   ├── cert.cnf
│       │   ├── sdk.crt
│       │   └── sdk.key
│       └── ssl              # RPC Service Certificate Directory
│           ├── ca.crt
│           ├── cert.cnf
│           ├── ssl.crt
│           └── ssl.key
└── ca                       # The CA certificate directory, which mainly includes the CA certificate and the CA private key. Keep the CA certificate and the CA private key properly
    ├── ca.crt
    ├── ca.key
    ├── ca.srl
    └── cert.cnf
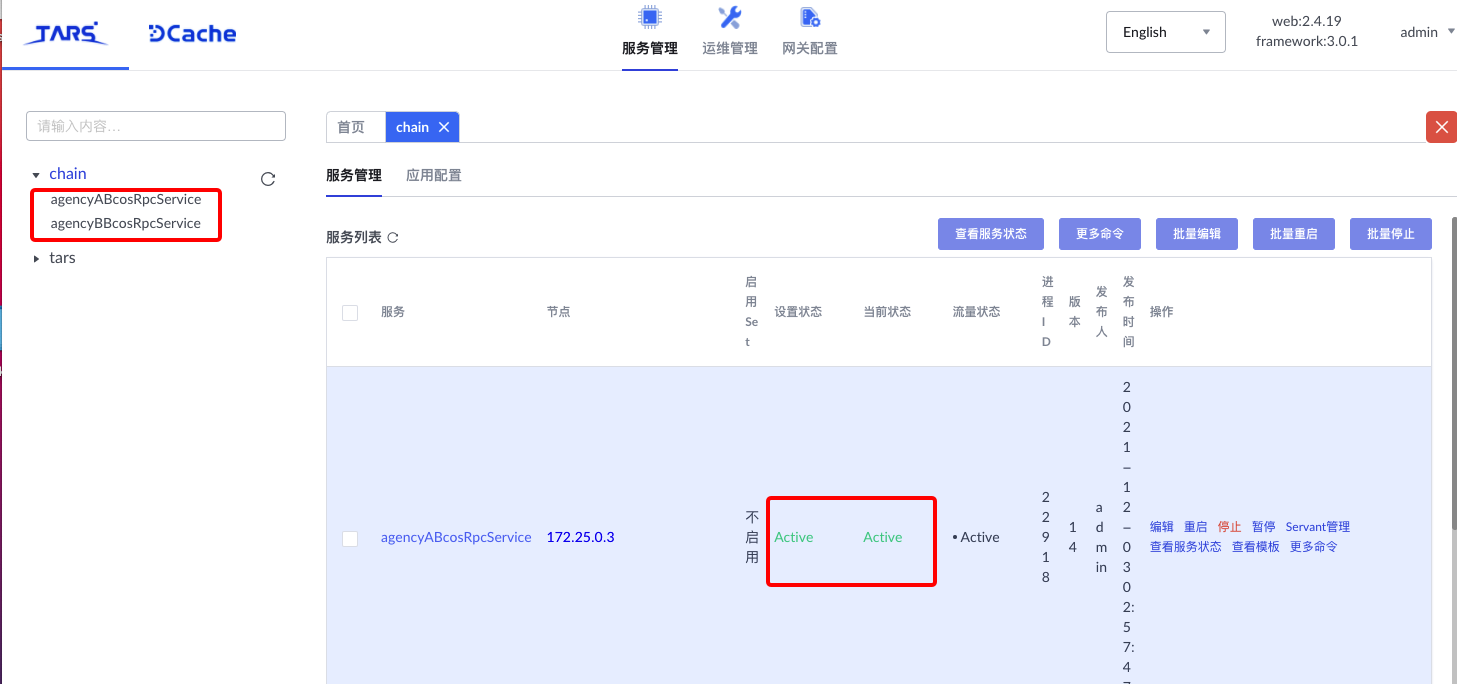
After the RPC service is started successfully, you can view the service lists’ agencyABcosRpcService ‘and’ agencyBBcosRpcService ‘on the tars web management platform, and each service is in the’ active ‘state:
Note
If you forget to access the token of the tars service, you can use the [admin] of the tars web management platform ->User Center ->[token management] obtaining the token list
-Before deploying the Pro version blockchain node, please make sure that your tars service is in the started state. Please refer to Section 3.2 for installing / starting and configuring the tars service - Keep the RPC service CA certificate and CA private key generated during service deployment for SDK certificate application, RPC service expansion, and other operations
4.3 Deploying Gateway Services
After the RPC service is deployed, you need to deploy the Gateway service to establish network connections between organizations。Run the following command in the BcosBuilder directory to deploy and start the gateway service of the two organizations. The corresponding gateway service names are ‘agencyABcosGatewayService’ and ‘agencyBBcosGatewayService’, the ip address is’ 172.25.0.3 ‘, and the occupied ports are’ 30300 ‘and’ 30301 ‘respectively(Before performing this operation, please make sure that the ‘30300’ and ‘30301’ ports of the machine are not occupied)。
# Enter the operation directory
cd ~/fisco/BcosBuilder/pro

# Deploy and start the Gateway service
python3 build_chain.py chain -o deploy -t gateway
After the preceding command is executed, when the script outputs’ deploy service success, type: gateway ‘, the RPC service is deployed successfully. The detailed log output is as follows:
=========================================================
----------- deploy service, type: gateway -----------
=========================================================
----------- generate service config -----------
* generate service config for 172.25.0.3 : agencyABcosGatewayService
* generate config for the gateway service
* generate generated/gateway/chain0/172.25.0.3/agencyABcosGatewayService/config.ini
* generate cert, output path: generated/gateway/chain0/172.25.0.3/agencyABcosGatewayService
* generate gateway connection file: generated/gateway/chain0/172.25.0.3/agencyABcosGatewayService/nodes.json
* generate config for the gateway service success
gen configuration for service agencyABcosGatewayService success
* generate service config for 172.25.0.3 : agencyBBcosGatewayService
* generate config for the gateway service
* generate generated/gateway/chain0/172.25.0.3/agencyBBcosGatewayService/config.ini
* generate cert, output path: generated/gateway/chain0/172.25.0.3/agencyBBcosGatewayService
* generate gateway connection file: generated/gateway/chain0/172.25.0.3/agencyBBcosGatewayService/nodes.json
* generate config for the gateway service success
gen configuration for service agencyBBcosGatewayService success
----------- generate service config success -----------
=========================================================
deploy_service to 172.25.0.3, app: chain0, name: agencyABcosGatewayService
deploy service agencyABcosGatewayService
* add config for service agencyABcosGatewayService, node: 172.25.0.3, config: nodes.json
* add config for service agencyABcosGatewayService, node: 172.25.0.3, config: ca.crt
* add config for service agencyABcosGatewayService, node: 172.25.0.3, config: ssl.key
* add config for service agencyABcosGatewayService, node: 172.25.0.3, config: ssl.crt
* add config for service agencyABcosGatewayService, node: 172.25.0.3, config: config.ini
upload tar package generated/./agencyABcosGatewayService.tgz success, config id: 14
deploy_service to 172.25.0.3, app: chain0, name: agencyBBcosGatewayService
deploy service agencyBBcosGatewayService
* add config for service agencyBBcosGatewayService, node: 172.25.0.3, config: nodes.json
* add config for service agencyBBcosGatewayService, node: 172.25.0.3, config: ca.crt
* add config for service agencyBBcosGatewayService, node: 172.25.0.3, config: ssl.key
* add config for service agencyBBcosGatewayService, node: 172.25.0.3, config: ssl.crt
* add config for service agencyBBcosGatewayService, node: 172.25.0.3, config: config.ini
upload tar package generated/./agencyBBcosGatewayService.tgz success, config id: 15
----------- deploy service success, type: gateway -----------
=========================================================
RPC service-related configuration generated during deployment is located in ‘generated / gateway / ${chainID}’Directory, as follows:
$ tree generated/gateway/chain0
generated/gateway/chain0
├── 172.25.0.3
│   ├── agencyABcosGatewayService # Gateway service configuration path of organization A
│   │   ├── config.ini       # Gateway Profile for Institution A
│   │   ├── nodes.json        # Gateway Service Connection Configuration for Institution A
│   │   └── ssl                   # Gateway Service Certificate Configuration for Institution A
│   │       ├── ca.crt
│   │       ├── cert.cnf
│   │       ├── ssl.crt
│   │       └── ssl.key
│   └── agencyBBcosGatewayService # Gateway service configuration path of organization B
│       ├── config.ini
│       ├── nodes.json
│       └── ssl
│           ├── ca.crt
│           ├── cert.cnf
│           ├── ssl.crt
│           └── ssl.key
└── ca                          # Configure the root certificate of the Gateway service. Save the root certificate and the root certificate private key
    ├── ca.crt
    ├── ca.key
    ├── ca.srl
    └── cert.cnf
Note
This step is performed on the basis of step 4.2
-Before deploying the Pro version blockchain node, please make sure that your tars service is in the started state. Please refer to Section 3.2 for installing / starting and configuring the tars service - Keep the RPC service CA certificate and CA private key generated during service deployment for operations such as gateway service expansion
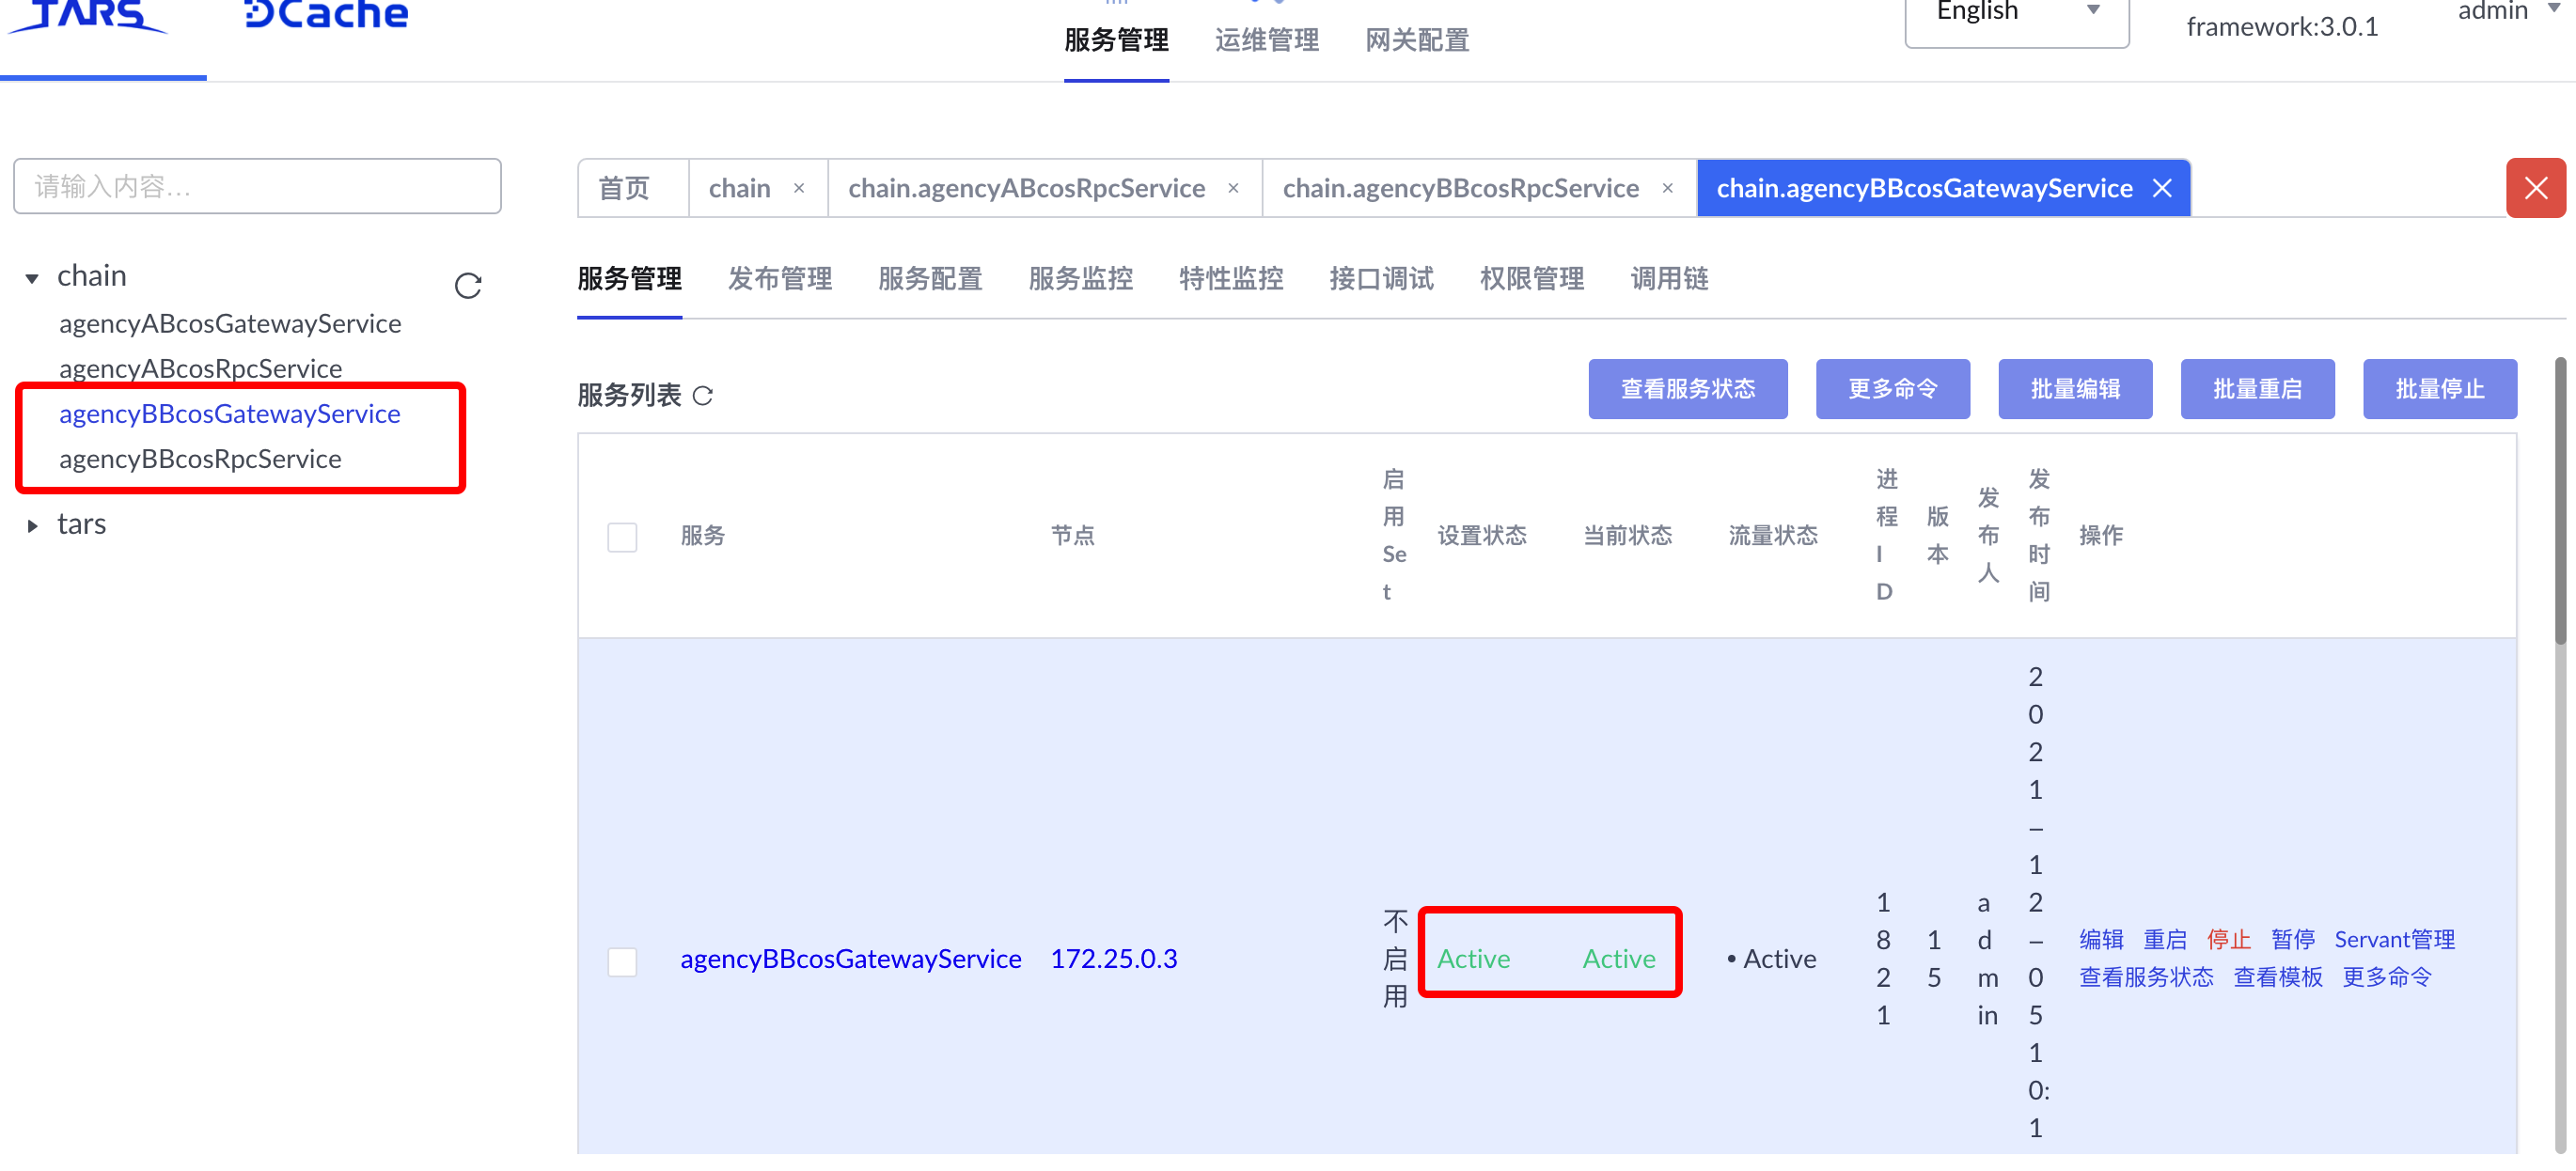
After the Gateway service is successfully started, you can view the service lists’ agencyABcosGatewayService ‘and’ agencyBBcosGatewayService ‘on the tars web management platform, and each service is in the’ active ‘state:
4.4 Deploying Blockchain Node Services
After the RPC service and the Gateway service are deployed, you can deploy the blockchain node service。Run the following command in the BcosBuilder directory to deploy and start the blockchain service of two institutions and two nodes. The corresponding service names are ‘group0node00BcosNodeService’ and ‘group0node10BcosNodeService’, and the chain ID is’ chain0 ‘and the group ID is’ group0’。
# Enter the operation directory
cd ~/fisco/BcosBuilder/pro

# Deploy and launch the blockchain node service
python3 build_chain.py chain -o deploy -t node
After the preceding command is executed, when the script outputs’ deploy all nodes of the given group success’, the blockchain node service is deployed successfully. The detailed log output is as follows:
=========================================================
----------- generate config for all nodes -----------
----------- generate genesis config for group group0 -----------
* generate pem file for agencyAgroup0node0BcosNodeService
	- pem_path: ./generated/chain0/group0/agencyAgroup0node0BcosNodeService/node.pem
	- node_id_path: ./generated/chain0/group0/agencyAgroup0node0BcosNodeService/node.nodeid
	- node_id: 4715fd07b43447102e91332dc4109cb7a857d53d304880cf7fb5d9964f3c51fd5524821b4890e2de38d4f174fd0af94c49c224f51bdad1e366f1571e7ba9d92f

	- sm_crypto: 0
* generate pem file for agencyBgroup0node0BcosNodeService
	- pem_path: ./generated/chain0/group0/agencyBgroup0node0BcosNodeService/node.pem
	- node_id_path: ./generated/chain0/group0/agencyBgroup0node0BcosNodeService/node.nodeid
	- node_id: 16bc2875e534053d501b63015d06a3249f1f8892e42d231896da75e76c905798900b57fd362dfb4dcce736a5f45c916cfad299214651ba75273df852e5baf50f

	- sm_crypto: 0
* generate_genesis_config_nodeid
* consensus_type: pbft
* block_tx_count_limit: 1000
* leader_period: 1
* gas_limit: 3000000000
* compatibility_version: 3.0.0
* generate_genesis_config_nodeid success
* store genesis config for chain0.group0
	 path: generated/chain0/group0/config.genesis
* store genesis config for chain0.group0 success
* store genesis config for agencyAgroup0node0BcosNodeService
	 path: ./generated/chain0/group0/agencyAgroup0node0BcosNodeService/config.genesis
* store genesis config for agencyAgroup0node0BcosNodeService success
* store genesis config for agencyBgroup0node0BcosNodeService
	 path: ./generated/chain0/group0/agencyBgroup0node0BcosNodeService/config.genesis
* store genesis config for agencyBgroup0node0BcosNodeService success
----------- generate genesis config for group0 success -----------
----------- generate ini config for group group0 -----------
* store ini config for agencyAgroup0node0BcosNodeService
	 path: ./generated/chain0/group0/agencyAgroup0node0BcosNodeService/config.ini
* store ini config for agencyAgroup0node0BcosNodeService success
* store ini config for agencyBgroup0node0BcosNodeService
	 path: ./generated/chain0/group0/agencyBgroup0node0BcosNodeService/config.ini
* store ini config for agencyBgroup0node0BcosNodeService success
----------- generate ini config for group group0 success -----------
----------- generate config for all nodes success -----------
deploy services for all the group nodes
deploy service agencyAgroup0node0BcosNodeService
upload tar package generated/./agencyAgroup0node0BcosNodeService.tgz success, config id: 16
deploy service agencyBgroup0node0BcosNodeService
upload tar package generated/./agencyBgroup0node0BcosNodeService.tgz success, config id: 17
=========================================================
The service-related configuration generated during deployment is located in ‘generated / ${chainID}`(‘chainID ‘defaults to’ chain’)Directory, as follows:
$ tree generated/chain0

generated/chain0
└── group0
    ├── agencyAgroup0node0BcosNodeService
    │   ├── config.genesis      # Genesis Block Configuration
    │   ├── config.ini          # Blockchain node configuration
    │   ├── node.nodeid         # Blockchain Node Service Signature Private Key
    │   └── node.pem
    ├── agencyBgroup0node0BcosNodeService
    │   ├── config.genesis
    │   ├── config.ini
    │   ├── node.nodeid
    │   └── node.pem
    └── config.genesis
Note
It is recommended to deploy the blockchain node service after deploying RPC and Gateway services
-Before deploying the Pro version blockchain node, please make sure that your tars service is in the started state. Please refer to Section 3.2 for installing / starting and configuring the tars service
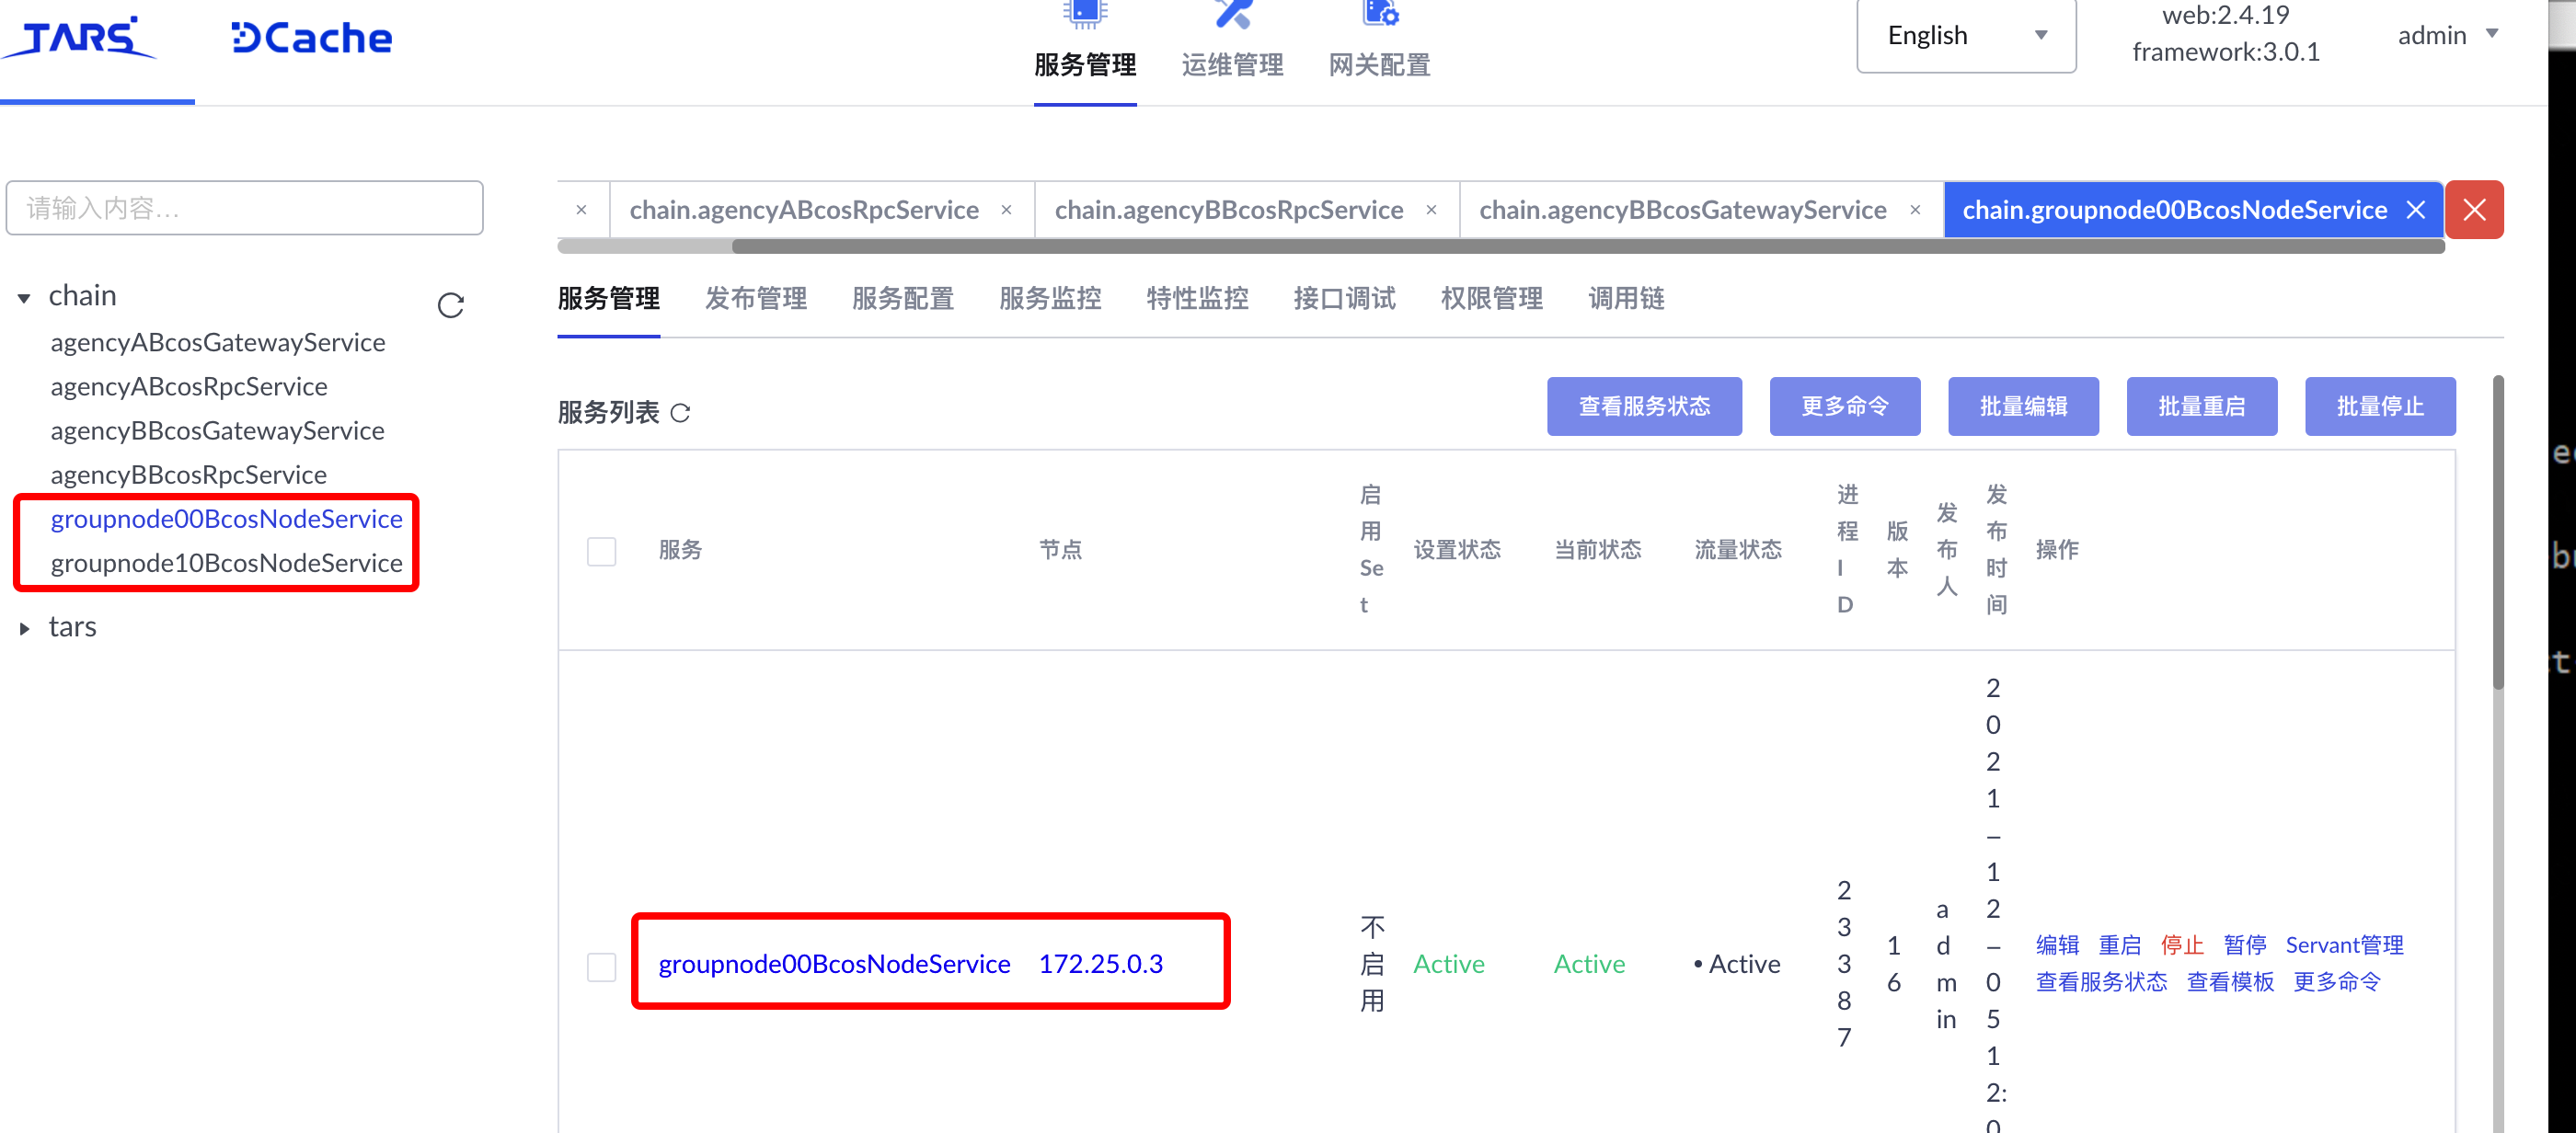
After the blockchain node service is successfully started, you can view the service lists’ agencyAgroup0node0BcosNodeService ‘and’ agencyBgroup0node0BcosNodeService ‘on the tars web page management platform, and each service is in the’ active ‘status:
4.5 Deploy the blockchain node monitoring service
After the RPC service, Gateway service, and node service are deployed, you can deploy the blockchain node monitoring service。Run the following command in the BcosBuilder / pro directory to deploy and start the blockchain node monitoring service。
# Enter the operation directory
cd ~/fisco/BcosBuilder/pro

# Deploy and launch the blockchain node service
python3 build_chain.py chain -o deploy -t monitor
After the preceding command is executed, when the script outputs’ deploy all nodes monitor success’, the blockchain node service is deployed successfully. The detailed log output is as follows:
=========================================================
----------- deploy all nodes monitor -----------
-----------  generate graphna&prometheus config  -----------
* store monitor config
	 path: /root/xiao/pro/BcosBuilder/pro/../docker/host/linux/monitor/prometheus/prometheus.yml
* store monitor config success
----------- generate graphna&prometheus config success -----------
----------- generate mtail config for group group0 -----------
* store mtail config for agencyAgroup0node0BcosNodeService
	 path: /root/app/tars/framework/app_log/chain0/agencyAgroup0node0BcosNodeService/mtail/node.mtail
* store mtail config for agencyAgroup0node0BcosNodeService success
* execute_ansible_copy_with_command pro path:
* store mtail config for agencyBgroup0node0BcosNodeService
	 path: /root/app/tars/framework/app_log/chain0/agencyBgroup0node0BcosNodeService/mtail/node.mtail
* store mtail config for agencyBgroup0node0BcosNodeService success
* execute_ansible_copy_with_command pro path:
----------- generate mtail config for group group0 success -----------
----------- deploy all nodes monitor success -----------
=========================================================
The configuration related to the monitoring service generated during deployment is located in the / root / app / tars / framework / app _ log directory, as follows:
[root@172 framework]# tree app_log/
app_log/
├── chain0
│   ├── agencyAgroup0node0BcosNodeService
│   │   └── mtail
│   │       ├── mtail
│   │       ├── node.mtail
│   │       ├── start_mtail_monitor.sh
│   │       └── stop_mtail_monitor.sh
│   └── agencyBgroup0node0BcosNodeService
│       └── mtail
│           ├── mtail
│           ├── node.mtail
│           ├── start_mtail_monitor.sh
│           └── stop_mtail_monitor.sh
Note
It is recommended to deploy the blockchain node monitoring service after deploying RPC, Gateway and node services
After the blockchain node service is successfully started, log in to grafana. The default listening port on the grafana UI management page is 3001, and the login URL is (http://ip:3001 / graphna). The default account name and password are admin / admin. Import the Dashboard after logging in (github source code) and configure the prometheus source (http://ip:9090 /) View real-time display of each indicator data。
5. Configure and use the console
The console is applicable to both the Pro version and the Air version of the FISCO BCOS blockchain, and the experience is completely consistent。After the Pro version blockchain experience environment is built, you can configure and use the console to send transactions to the Pro version blockchain。
5.1 Installation Dependencies
Note
-For console configuration methods and commands, please refer to ‘here<../../operation_and_maintenance/console/console_config.html>`_
Before using the console, you need to install the java environment:
# Ubuntu system installation java
sudo apt install -y default-jdk

#Centos system installed java
sudo yum install -y java java-devel
5.2 Download, configure, and use the console
Step 1: Download the Console
cd ~/fisco && curl -LO https://github.com/FISCO-BCOS/console/releases/download/v3.6.0/download_console.sh && bash download_console.sh
Note
-If you cannot download for a long time due to network problems, please try ‘cd ~ / fisco & & curl-#LO https://gitee.com/FISCO-BCOS/console/raw/master/tools/download_console.sh`
Step 2: Configure the Console
Copy console configuration file
If the RPC service does not use the default port, replace 20200 in the file with the RPC service listening port。
# The latest version of the console uses the following command to copy the configuration file
cp -n console/conf/config-example.toml console/conf/config.toml
Configure console certificates
# All SDK certificate paths can be found through the command find.-name sdk
cp -r BcosBuilder/pro/generated/rpc/chain0/agencyBBcosRpcService/172.25.0.3/sdk/* console/conf
Step 3: Launch and use the console
cd ~/fisco/console && bash start.sh
The output indicates that the startup is successful. Otherwise, check whether the node port configuration in conf / config.toml is correct and whether the SDK certificate is configured:
=============================================================================================
Welcome to FISCO BCOS console(3.4.0)!
Type 'help' or 'h' for help. Type 'quit' or 'q' to quit console.
 ________ ______  ______   ______   ______       _______   ______   ______   ______
|        |      \/      \ /      \ /      \     |       \ /      \ /      \ /      \
| $$$$$$$$\$$$$$|  $$$$$$|  $$$$$$|  $$$$$$\    | $$$$$$$|  $$$$$$|  $$$$$$|  $$$$$$\
| $$__     | $$ | $$___\$| $$   \$| $$  | $$    | $$__/ $| $$   \$| $$  | $| $$___\$$
| $$  \    | $$  \$$    \| $$     | $$  | $$    | $$    $| $$     | $$  | $$\$$    \
| $$$$$    | $$  _\$$$$$$| $$   __| $$  | $$    | $$$$$$$| $$   __| $$  | $$_\$$$$$$\
| $$      _| $$_|  \__| $| $$__/  | $$__/ $$    | $$__/ $| $$__/  | $$__/ $|  \__| $$
| $$     |   $$ \\$$    $$\$$    $$\$$    $$    | $$    $$\$$    $$\$$    $$\$$    $$
 \$$      \$$$$$$ \$$$$$$  \$$$$$$  \$$$$$$      \$$$$$$$  \$$$$$$  \$$$$$$  \$$$$$$

=============================================================================================
Get information with the console
# Get network connection information:
[group0]: /> getPeers
PeersInfo{
    p2pNodeID='3082010a0282010100c1d64abf0af11ceaa69b237090a5078ccbc122aedbf93486100ae65cb38cbf2a6969b80f2beca1abba7f0c1674876b332380a4b76387d62445ba8da7190b54850ed8c3fb4d6f6bafbd4744249a55805c0d804db9aa0f105c44c3381de20c763469892fc11a2bc8467c523592c9b2738069d6beb4cfb413f90e0be53205eca1cf3618100c625667f0592fd682aabe9cfbca7f7c53d79eeb5961ed9f144681b32c9fa55fc4d80b5ffbf32a9f71e900bc1c9a92ce0a485bb1003a915f9215bd7c42461cd52d1b2add644e8c1c273aa3668d4a707771b1a99d6bfcbfdf28be5b9c619eefb0c182ea7e666c5753c79499b1959df17ad5bd0996b9d7f0d62aa53d2b450203010001',
    endPoint='0.0.0.0:30301',
    groupNodeIDInfo=[
        NodeIDInfo{
            group='group',
            nodeIDList=[
                4af0433ac2d2afe305b88e7faae8ea4e94b14c63e78ca93c5c836ece6d0fbcb3d2a476a74ae8fb0a11e9662c0ce9861427c314aea7386cb3b619a4cb21ab227a
            ]
        }
    ],
    peers=[
        PeerInfo{
            p2pNodeID='3082010a0282010100cd8978651421e2861330242b1736a1814e4f2654476ae177c81494c52aef4e30821689029bff53a6b8d671967e5ca52d40c821775013f663ce003acd40a037a2cf19ed2bb20b92cb519636aa7402499df8e9324a0120cd199de97330f5942cca54ebfd5abb425f5c9128cd7bfa3956281614d492c9858d24ddea336651926869cde4e329550708b78d657019ee19ab9024305b32ffa96ed81d04be9124dc74d8d320b570b446a0b95af051fecbf3e49a3d64daea8b044ae09e891a89e59e87ca3db65bc67c16b6787f804b19a158e957a7b8d734159677837d2cd28f85cc79559d38f64e757c4fa7246604542c01cec2a3805066c4d026b9a90091b0bf67efe30203010001',
            endPoint='172.25.0.3:30300',
            groupNodeIDInfo=[
                NodeIDInfo{
                    group='group',
                    nodeIDList=[
                        8230e3ad1e7e929044a4ec8a5aca3c16744338a2fdd2865745aab9eef88f5a5c18b0d912a7a047966d112847d5c79eef46b32f7d9a2818adb601049126d289f3
                    ]
                }
            ]
        }
    ]
}

# Obtaining Node List Information
[group0]: /> getGroupPeers
peer0: 4af0433ac2d2afe305b88e7faae8ea4e94b14c63e78ca93c5c836ece6d0fbcb3d2a476a74ae8fb0a11e9662c0ce9861427c314aea7386cb3b619a4cb21ab227a
peer1: 8230e3ad1e7e929044a4ec8a5aca3c16744338a2fdd2865745aab9eef88f5a5c18b0d912a7a047966d112847d5c79eef46b32f7d9a2818adb601049126d289f3

[group0]: /> getSealerList
[
    Sealer{
        nodeID='8230e3ad1e7e929044a4ec8a5aca3c16744338a2fdd2865745aab9eef88f5a5c18b0d912a7a047966d112847d5c79eef46b32f7d9a2818adb601049126d289f3',
        weight=1
    },
    Sealer{
        nodeID='4af0433ac2d2afe305b88e7faae8ea4e94b14c63e78ca93c5c836ece6d0fbcb3d2a476a74ae8fb0a11e9662c0ce9861427c314aea7386cb3b619a4cb21ab227a',
        weight=1
    }
]
5.3. Deploy and invoke contracts
Step 1: Write the HelloWorld contract
HelloWorld contract provides two interfaces’ get()’and’ set()’, used to get / set the contract variable’ name ‘, the contract content is as follows:
pragma solidity >=0.6.10 <0.8.20;
contract HelloWorld {
    string name;

    constructor() public {
        name = "Hello, World!";
    }

    function get() public view returns (string memory) {
        return name;
    }

    function set(string memory n) public {
        name = n;
    }
}
Step 2: Deploying HelloWorld Contracts
For quick user experience, the HelloWorld contract has been built into the console, located in the console directory ‘contracts / consolidation / HelloWorld。sol ‘, refer to the following command to deploy:
# Enter the following command in the console to return the contract address if the deployment is successful
[group0]: /> deploy HelloWorld
transaction hash: 0x0fe66c42f2678b8d041624358837de34ac7db195abb6f5a57201952062190590
contract address: 0x6849F21D1E455e9f0712b1e99Fa4FCD23758E8F1
currentAccount: 0x537149148696c7e6c3449331d77ddfaabc3c7a75

# View current block height
[group0]: /> getBlockNumber
1
Step 3. Invoke the HelloWorld contract
# Call the get interface to get the name variable, where the contract address is the address returned by the deploy command
[group0]: /> call HelloWorld 0x6849F21D1E455e9f0712b1e99Fa4FCD23758E8F1 get
---------------------------------------------------------------------------------------------
Return code: 0
description: transaction executed successfully
Return message: Success
---------------------------------------------------------------------------------------------
Return value size:1
Return types: (string)
Return values:(Hello, World!)
---------------------------------------------------------------------------------------------

# Check the current block height, the block height remains unchanged, because the get interface does not change the ledger status
[group0]: /> getBlockNumber
1

# Call the set method to set the name
[group0]: /> call HelloWorld 0x6849F21D1E455e9f0712b1e99Fa4FCD23758E8F1 set "Hello, FISCO BCOS"
transaction hash: 0x2f7c85c2c59a76ccaad85d95b09497ad05ca7983c5ec79c8f9d102d1c8dddc30
---------------------------------------------------------------------------------------------
transaction status: 0
description: transaction executed successfully
---------------------------------------------------------------------------------------------
Receipt message: Success
Return message: Success
Return value size:0
Return types: ()
Return values:()
---------------------------------------------------------------------------------------------
Event logs
Event: {}

# View the current block height, because the set interface has modified the ledger status and the block height has increased to 2
[group0]: /> getBlockNumber
2

# Exit Console
[group0]: /> exit
6 Deploy the blockchain node monitoring service
Note
It is recommended to deploy the blockchain node monitoring service after deploying RPC, Gateway and node services
This step is optional
FISCO BCOS provides the monitoring service. Run the following command in the ‘BcosBuilder / pro’ directory to deploy and start the blockchain node monitoring service。
# Enter the operation directory
cd ~/fisco/BcosBuilder/pro

# Deploy and launch the blockchain node service
python3 build_chain.py chain -o deploy -t monitor
After the preceding command is executed, when the script outputs’ deploy all nodes monitor success’, the blockchain node service is deployed successfully. The detailed log output is as follows:
=========================================================
----------- deploy all nodes monitor -----------
-----------  generate graphna&prometheus config  -----------
* store monitor config
	 path: /home/fisco/BcosBuilder/pro/../docker/host/linux/monitor/prometheus/prometheus.yml
* store monitor config success
----------- generate graphna&prometheus config success -----------
----------- generate mtail config for group group0 -----------
* store mtail config for agencyAgroup0node0BcosNodeService
	 path: /home/fisco/app/tars/framework/app_log/chain0/agencyAgroup0node0BcosNodeService/mtail/node.mtail
* store mtail config for agencyAgroup0node0BcosNodeService success
* execute_ansible_copy_with_command pro path:
* store mtail config for agencyBgroup0node0BcosNodeService
	 path: /home/fisco/app/tars/framework/app_log/chain0/agencyBgroup0node0BcosNodeService/mtail/node.mtail
* store mtail config for agencyBgroup0node0BcosNodeService success
* execute_ansible_copy_with_command pro path:
----------- generate mtail config for group group0 success -----------
----------- deploy all nodes monitor success -----------
=========================================================
The configuration related to the monitoring service generated during deployment is located in the ‘/ home / fisco / app / tars / framework / app _ log’ directory, as follows:
# tree app_log/
app_log/
├── chain0
│   ├── agencyAgroup0node0BcosNodeService
│   │   └── mtail
│   │       ├── mtail
│   │       ├── node.mtail
│   │       ├── start_mtail_monitor.sh
│   │       └── stop_mtail_monitor.sh
│   └── agencyBgroup0node0BcosNodeService
│       └── mtail
│           ├── mtail
│           ├── node.mtail
│           ├── start_mtail_monitor.sh
│           └── stop_mtail_monitor.sh
After the blockchain node service is successfully started, you can view the data of each metric on the graphna and prometheus pages。